


Somewhere out there right now, a business owner is staring at their website admin panel, googling “how to add google analytics” for the third time this month, clicking through five different tabs, and still not sure if anything actually worked. That’s not a rare situation. That’s basically everyone’s first week with GA4.
Here’s the thing nobody tells you upfront: Google Analytics 4 isn’t hard because the buttons are hidden or confusing. It’s hard because most guides teach you where to click without explaining what you’re actually building. You end up with a tracking code pasted somewhere, a dashboard full of numbers, and zero clue why any of it matters. Then three weeks later someone asks “so how’s the site performing” and you just shrug.
This guide fixes that. By the end of it, GA4 will be correctly installed on your site, verified to actually be working (not just “probably working”), and you’ll understand the account structure well enough that opening the dashboard doesn’t feel like reading a foreign language. No skipped steps, no “just trust the process.” Every click gets explained, and every decision point gets a reason attached to it, so you’re not just following instructions blind.
What Is Google Analytics (GA4) and Why You Need It
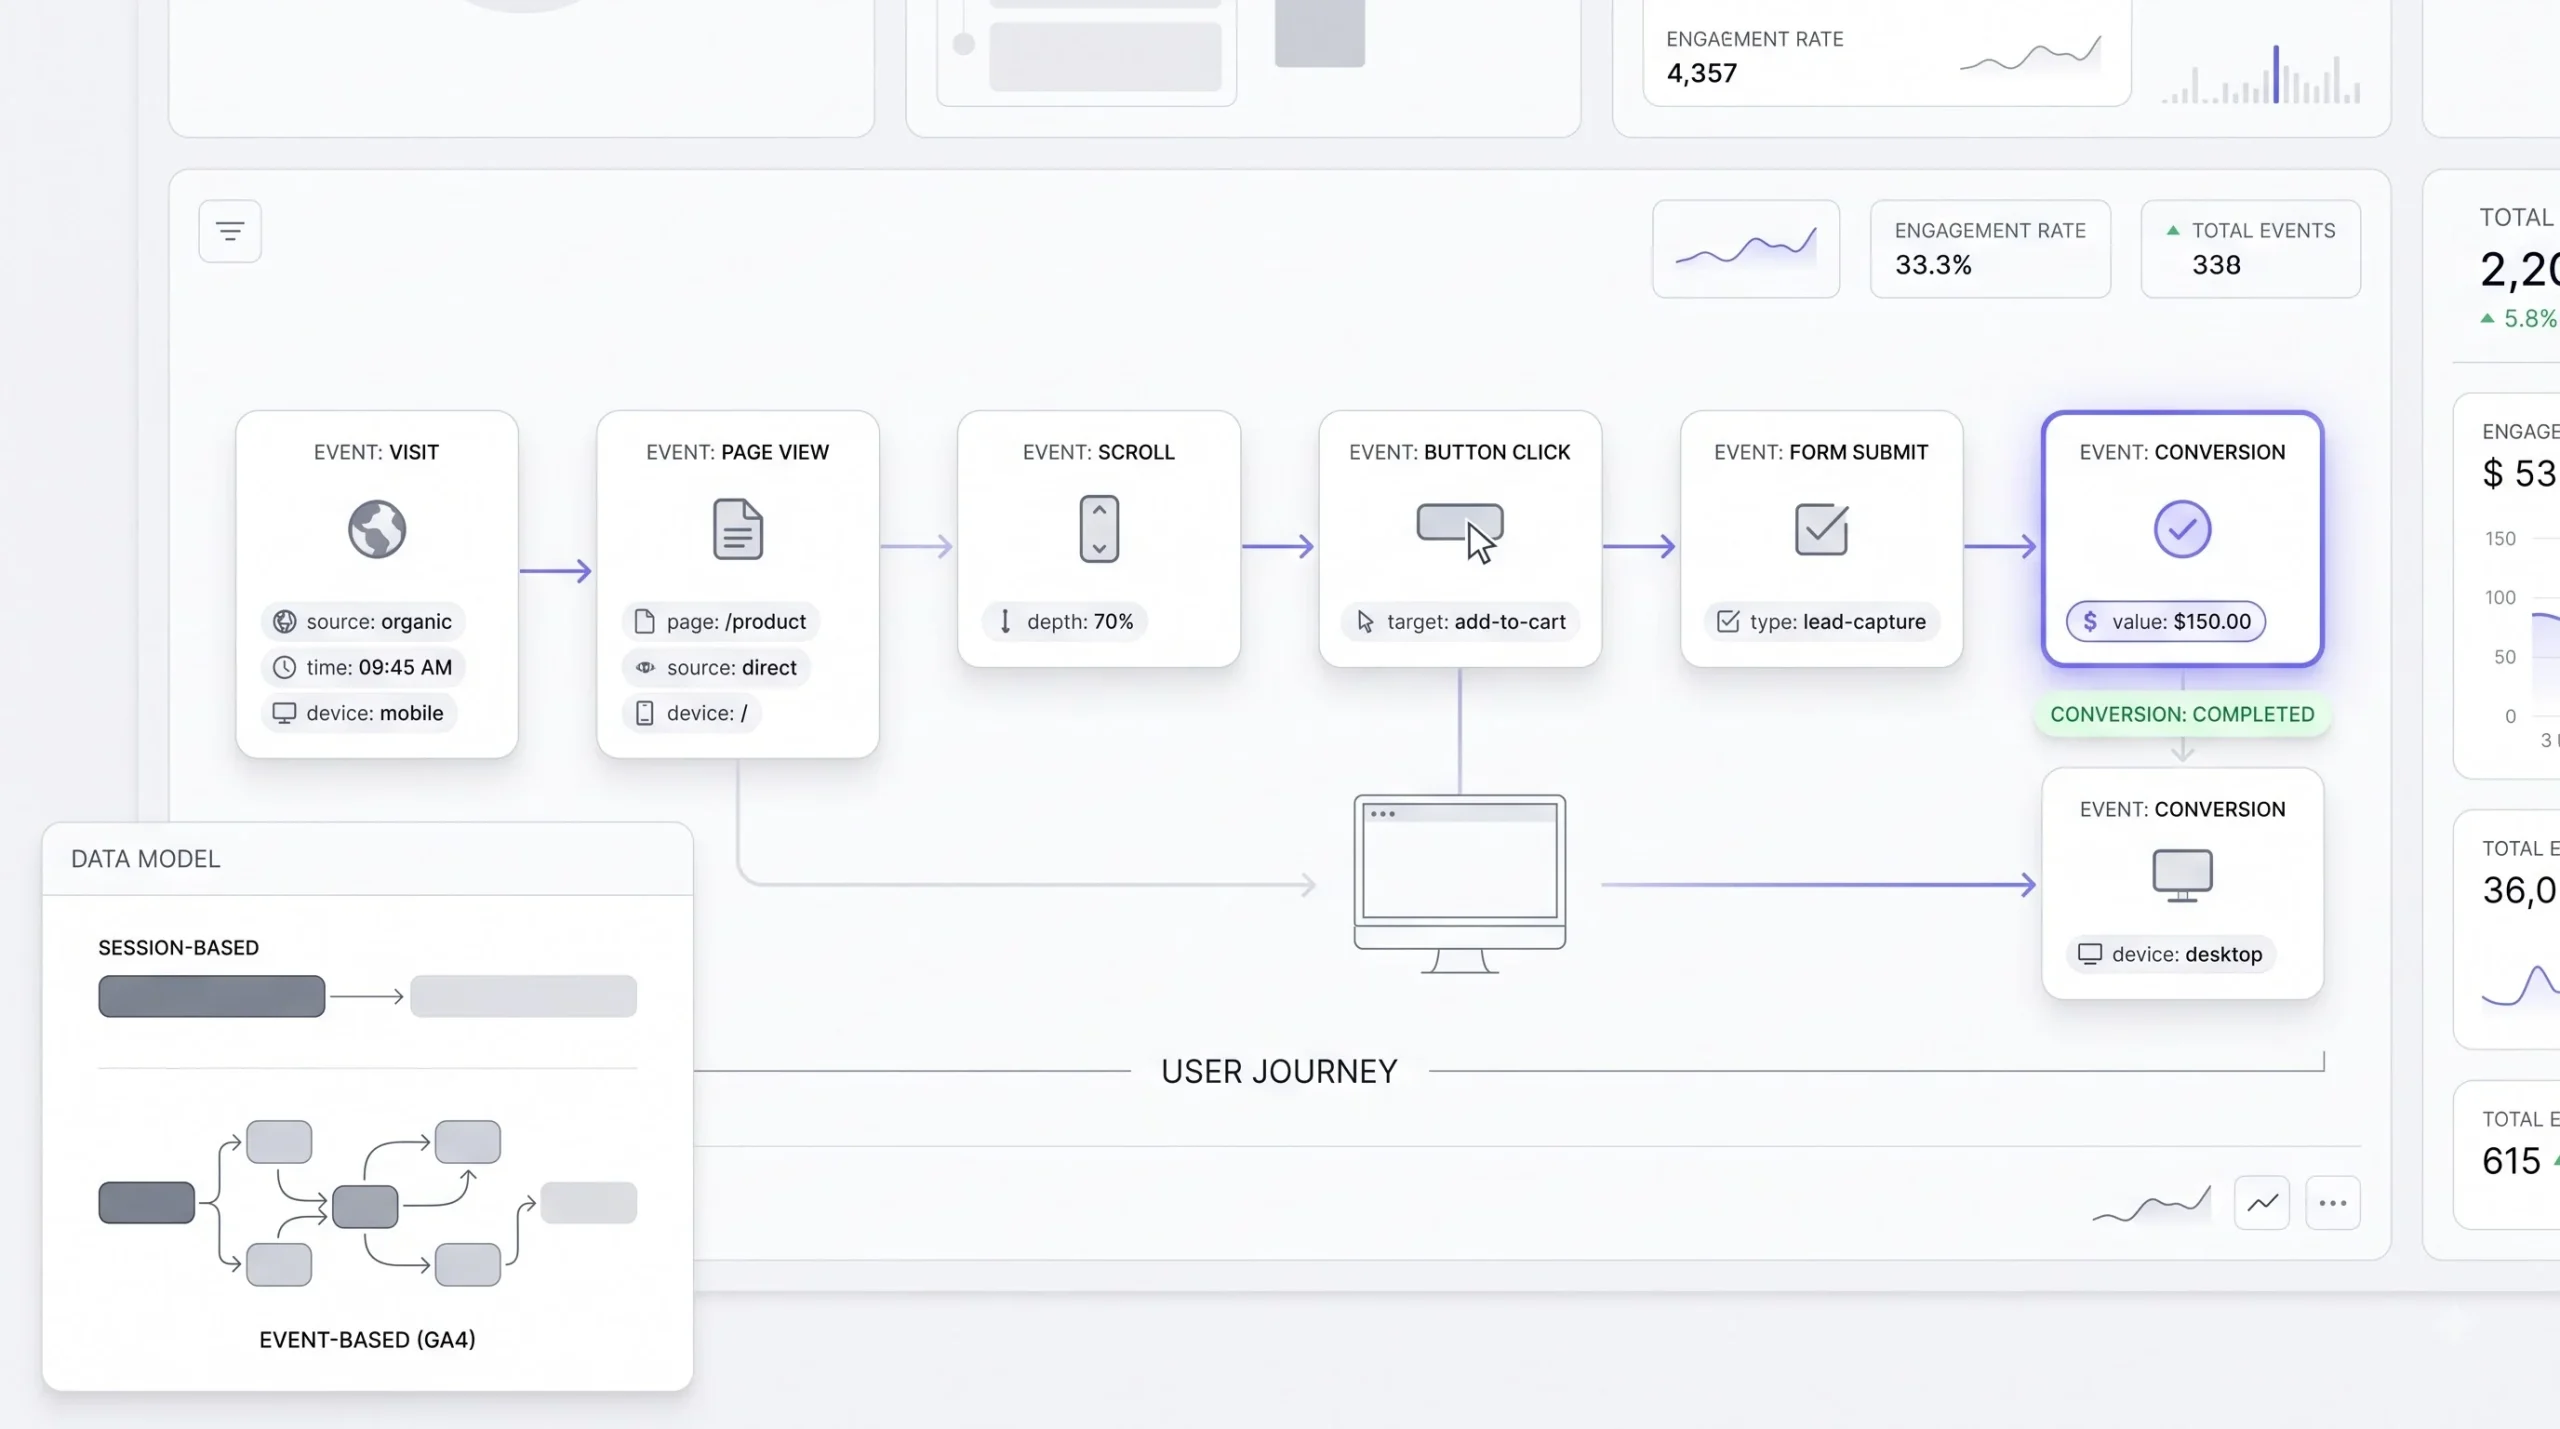
Google Analytics 4 is the current version of Google’s website and app tracking tool, and it works completely differently from the version most people remember. If you used Google Analytics before 2020, forget most of what you learned. GA4 isn’t an update. It’s a rebuild from the ground up, different data model, different terminology, different reporting logic underneath it.
The old version, Universal Analytics, tracked everything around “sessions” and “pageviews.” Someone visits your site, that’s a session. They look at three pages, that’s three pageviews. A session in UA technically ended after 30 minutes of inactivity or at midnight, whichever came first, which sounds like a small detail but actually created weird artifacts in the data. Someone browsing right around midnight would get counted as two separate sessions even though it was one continuous visit. Simple system, but limited, and full of these small quirks that added up.
GA4 tracks everything as an “event” instead. A pageview is an event (specifically, page_view). A scroll is an event. Clicking a button, watching a video, submitting a form, downloading a PDF, all events, each with its own name and its own set of parameters attached to it. A page_view event, for example, doesn’t just say “a page was viewed,” it carries parameters like the page location, the page title, the referrer. That’s the real shift here: instead of a handful of fixed metrics like pageviews and sessions, GA4 gives you an open-ended stream of labeled actions, each one carrying whatever context you choose to attach to it.
This sounds like a small technical difference, but it changes how you think about your data entirely. Instead of asking “how many pageviews did we get,” you start asking “what did people actually do, in what order, and what happened right before they converted or left.” That’s a fundamentally more useful question, and it’s the reason GA4’s reporting feels unfamiliar at first if you’re used to the old pageview-centric view.
Why did Google force this change? A few real reasons, not just Google wanting something new to sell. The old cookie-based, session-based model was built for a browser-only, desktop-first internet that doesn’t exist anymore. People bounce between a phone, a laptop, sometimes a tablet, often within the same buying decision. Ad blockers and browser privacy changes (Safari’s Intelligent Tracking Prevention, Firefox’s Enhanced Tracking Protection, third-party cookie restrictions in Chrome) have been steadily cutting into how reliably a session-based cookie system can even track someone across a visit, let alone across devices. GA4 was built to work in a world where cookies can’t be fully trusted, using event-based modeling and, when needed, modeled data to fill gaps where direct tracking isn’t available. Whether that modeling is perfect is a fair debate, but the direction was necessary. The old system was going to keep degrading no matter what Google did.
What does this actually get you, practically speaking? Better attribution, meaning a clearer picture of which channel actually deserves credit for a conversion instead of just crediting whatever the last click happened to be. Real cross-device stitching when someone is signed into a Google account across devices. And audience building based on actual behavior sequences, not just static demographic buckets. If you’re running paid ads, doing content marketing, or trying to figure out where your leads are genuinely coming from, this is the tool doing that math in the background, every single day, whether you’re looking at it or not.
| Aspect | Universal Analytics | GA4 |
|---|---|---|
| Data model | Session-based | Event-based |
| Bounce rate | Traditional definition (single-page sessions) | Replaced by engagement rate, based on active engagement time and event count |
| Cross-device tracking | Limited, mostly cookie-dependent | Built-in, uses Google signals where available |
| Default reporting | Pageview-heavy | Event and conversion-heavy |
| Session definition | 30-minute timeout, resets at midnight | More continuous, less arbitrary cutoffs |
Tip: If you still have Universal Analytics data sitting around from before, that data is frozen. GA4 does not pull in your old UA history automatically, and there’s no official Google tool that migrates it over either. If you need those old numbers for reference, export them separately before they become impossible to access. Universal Analytics data has already stopped being viewable in most standard reports, so don’t assume this can wait.
Before You Start: What You Need
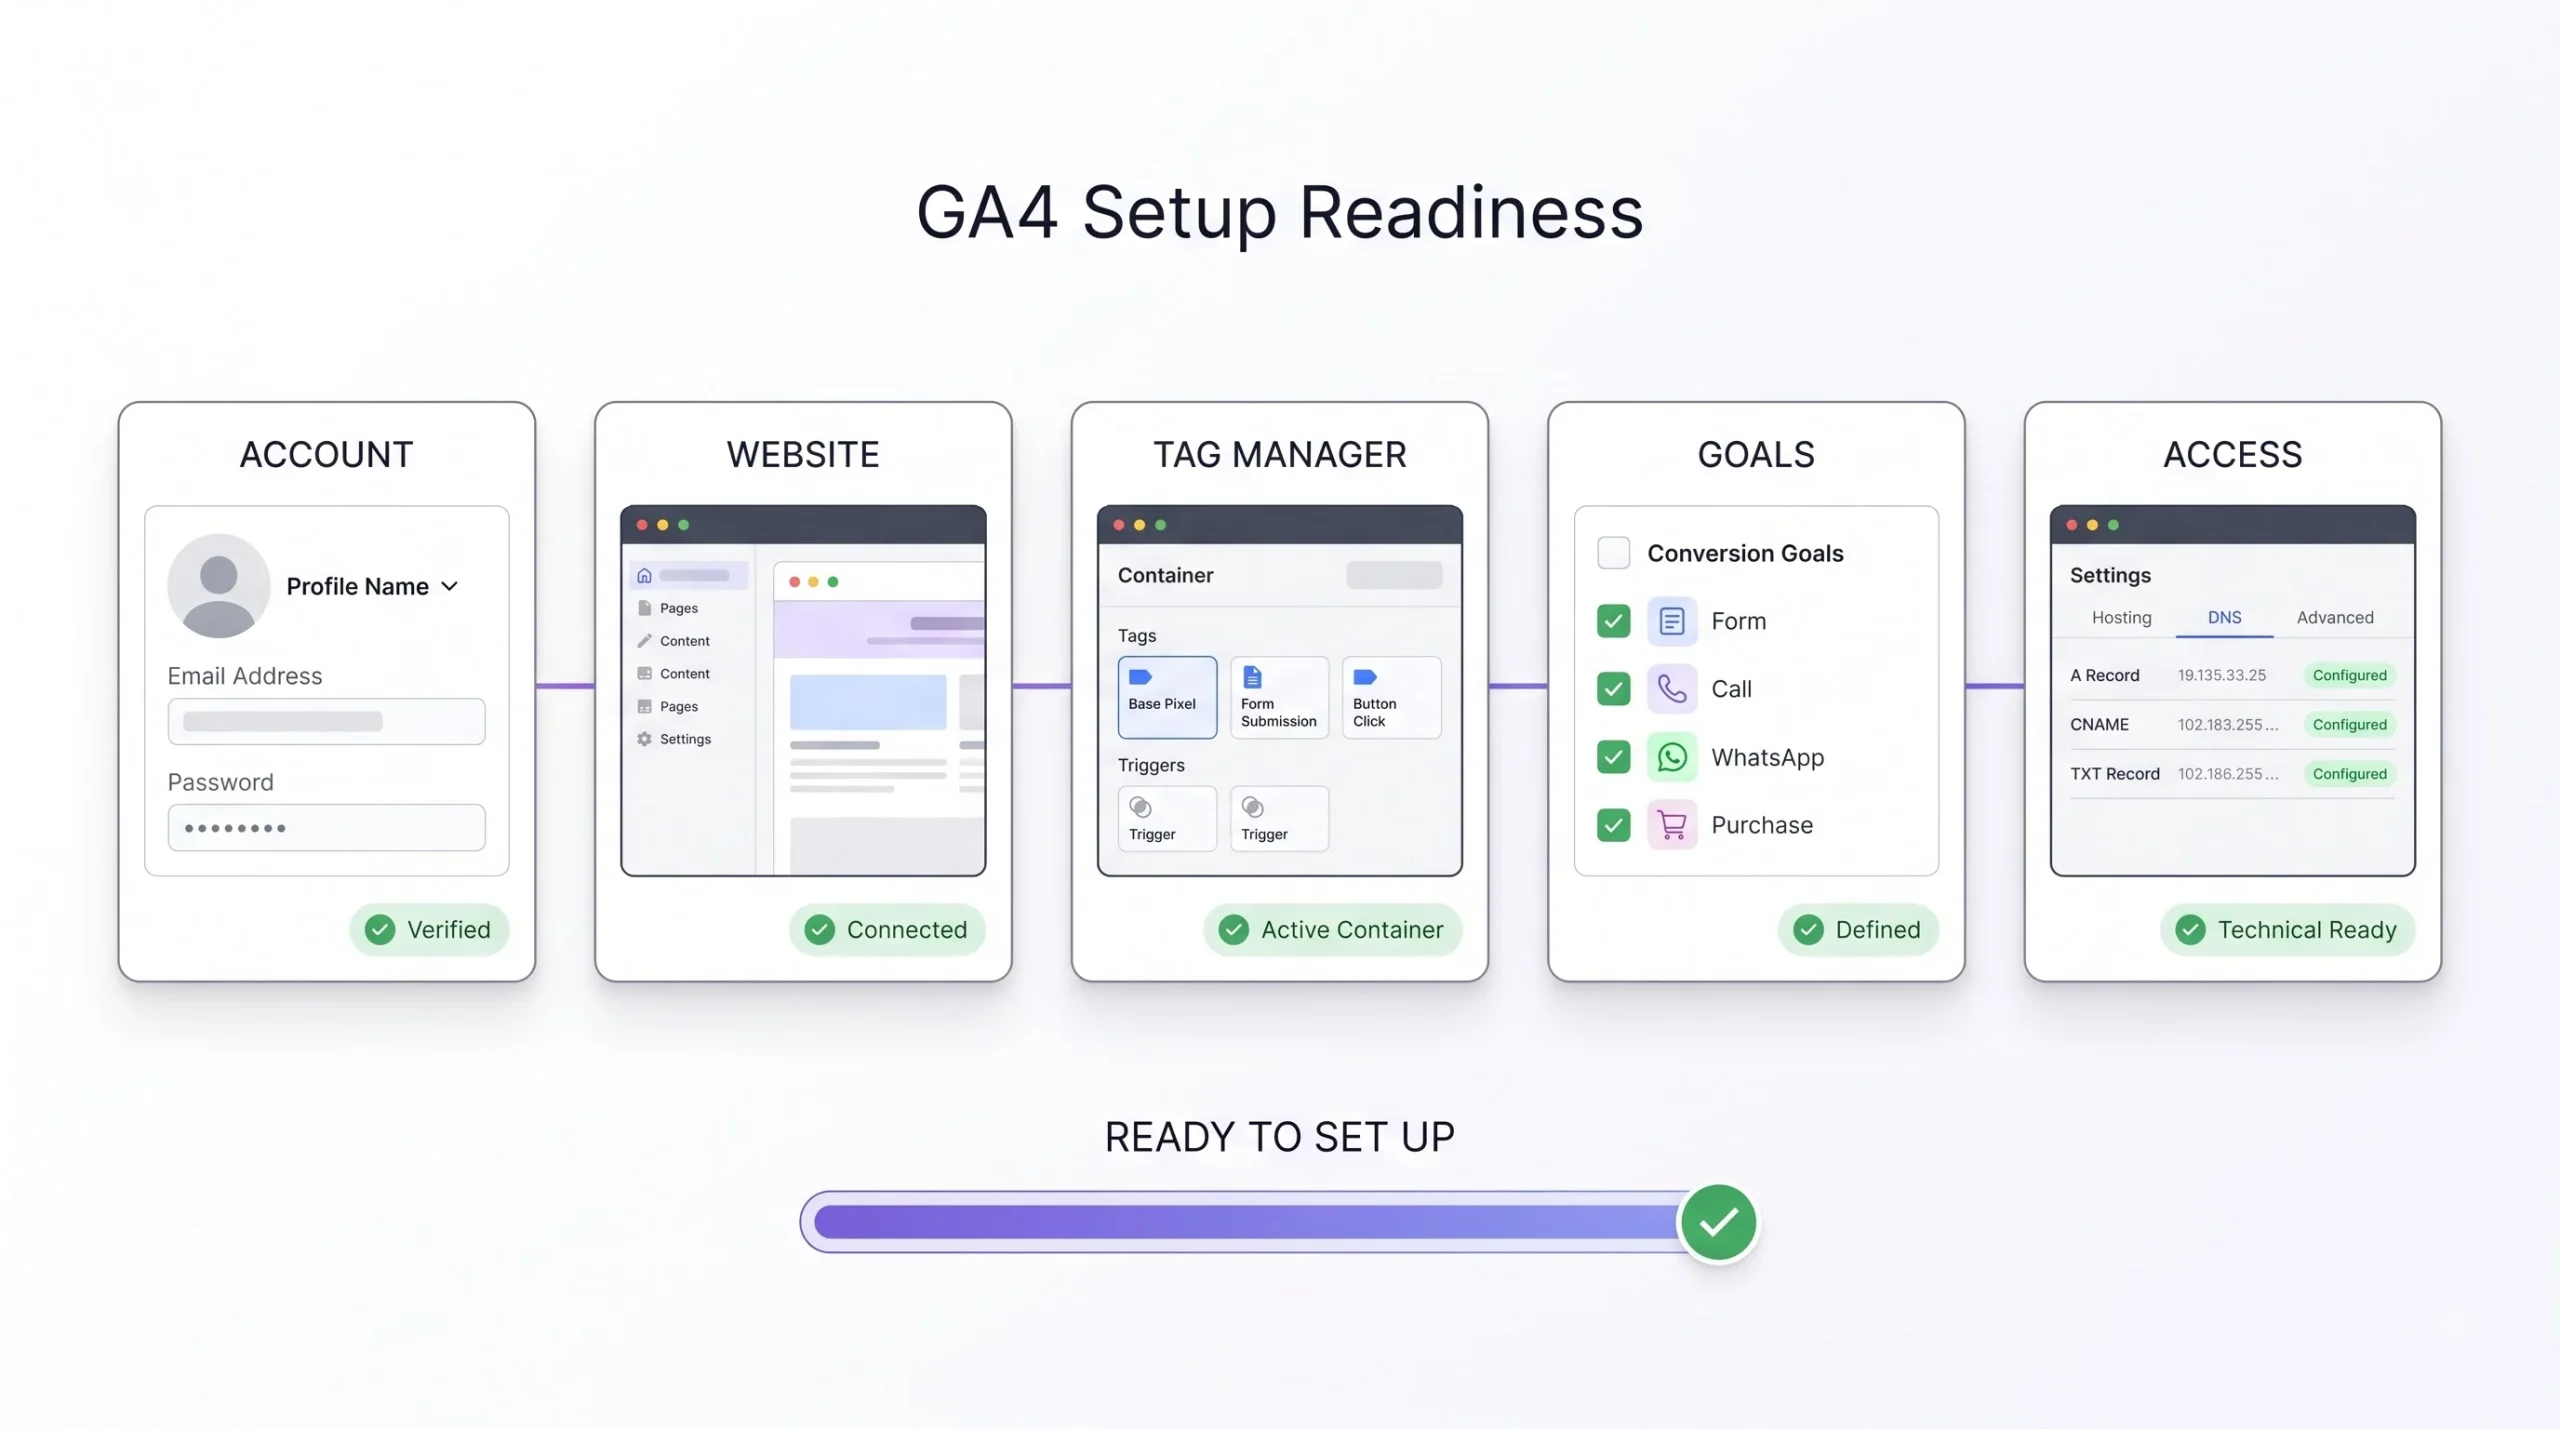
Setup goes faster and cleaner if a few things are sorted before opening the Analytics dashboard. Skip this part and you’ll end up pausing halfway through to go find a password or figure out who owns what.
- A Google account. Doesn’t need to be your personal Gmail. Plenty of businesses create a dedicated Google account just for their marketing tools, separate from any individual’s personal account. This matters more than it sounds, because if the person who set up Analytics under their personal account ever leaves the business, access can become a real headache to recover.
- Admin or owner-level access to the website. You’ll need to either paste code into the site’s header, access the CMS backend, or have FTP access, depending on which install method gets used. If someone else manages the site (a developer, an agency, a freelancer), get that access sorted first, not mid-setup. Nothing worse than getting to the installation step and realizing you can’t actually edit the site.
- A Google Tag Manager account (optional, but recommended). Not mandatory for basic tracking, but if there’s any chance of adding more tracking tools later, Meta Pixel, LinkedIn Insight Tag, Google Ads conversion tracking, setting up through GTM from day one saves real pain later. Retrofitting GTM onto a site that already has three hardcoded scripts pasted directly into the header is more work than just starting with GTM in the first place.
- Clarity on what actually counts as success for the site. Is a form submission a win? A phone click? A course enrollment? A WhatsApp message? Knowing this before setup means the event tracking planned later actually maps to something the business cares about, instead of tracking clicks just because they’re trackable.
- Basic access to whoever manages DNS or hosting, if things go wrong. Not always needed, but if the tracking code isn’t firing and it turns out to be a caching issue or a security plugin stripping scripts, someone will need access to troubleshoot at that level too.
Understanding the GA4 Account Structure
This is the part almost every beginner guide rushes through, and it’s exactly where people get lost three months later. So slow down here, because getting this wrong is one of the few GA4 mistakes that’s genuinely painful to undo.
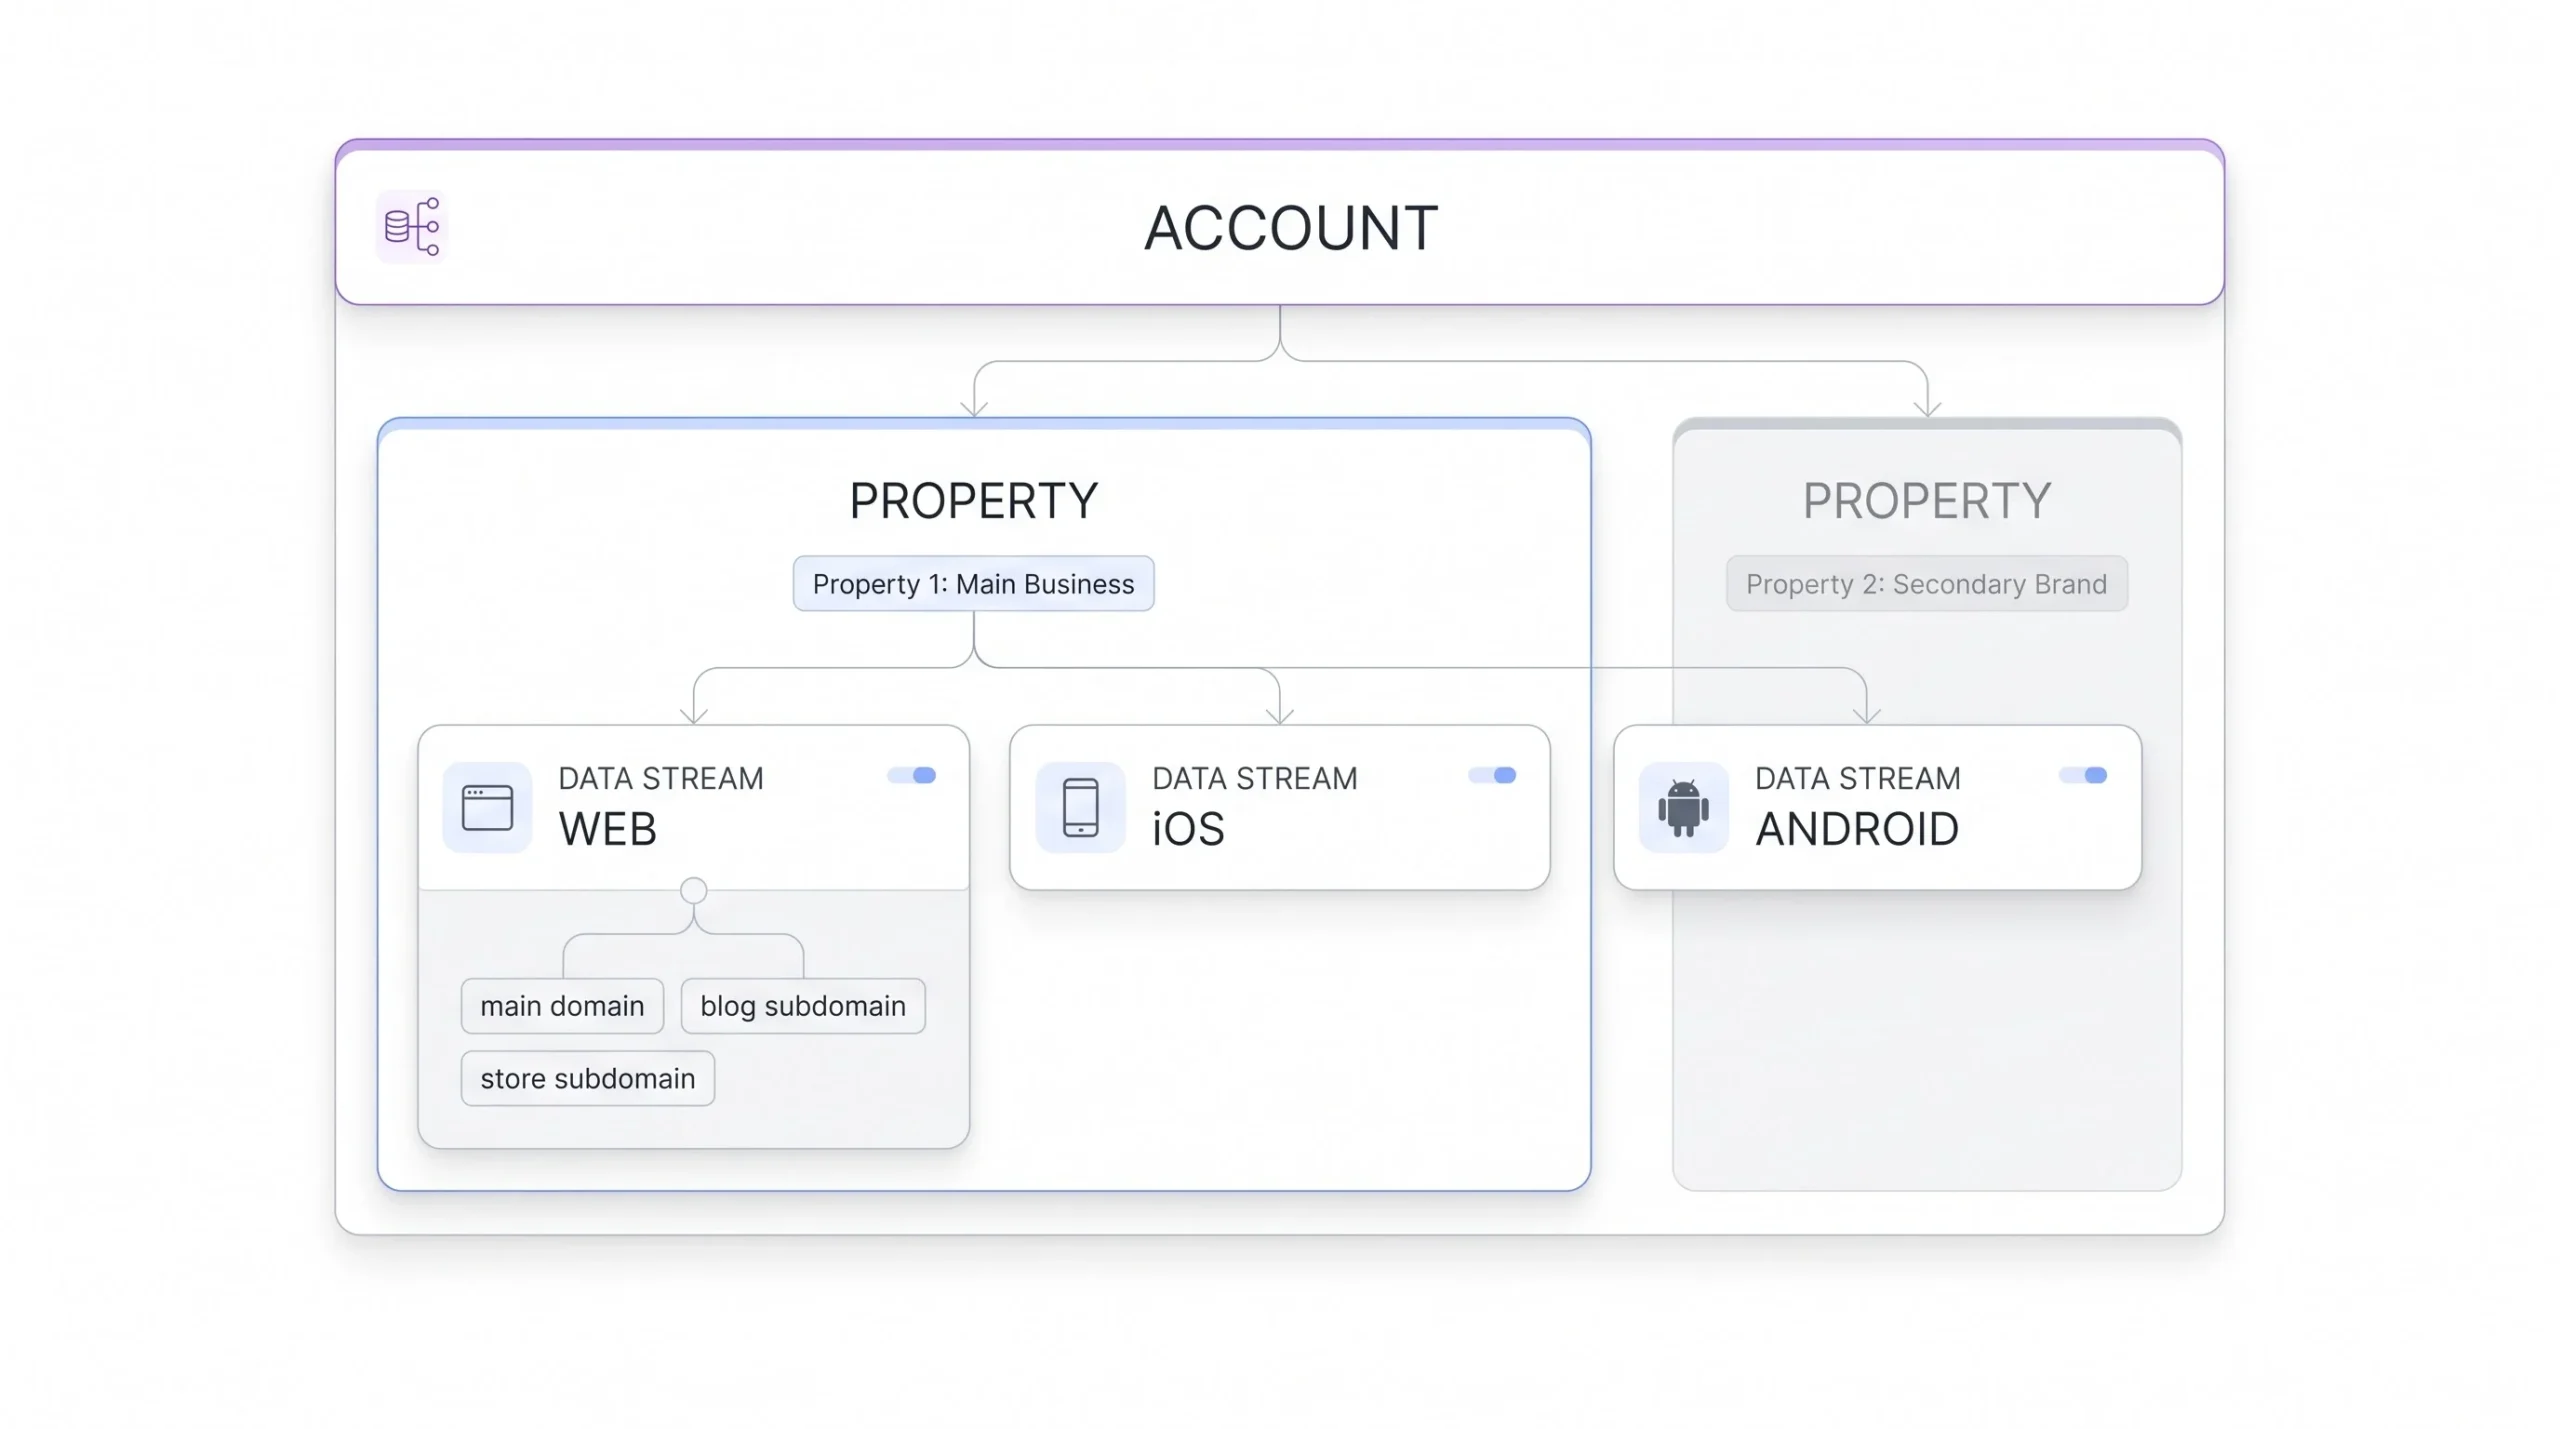
GA4 organizes everything in three layers, and getting this right at the start avoids messy cleanup down the line.
At the top sits the Account. Think of this as the umbrella. One account can hold multiple properties underneath it, and one Google login can have access to multiple accounts. If a business runs several distinct brands or websites, they usually sit under one account, with each site as its own property underneath.
Below that is the Property. A property represents one specific business, app, or website. This is where most of the actual configuration happens, data streams, events, conversions, audiences, user permissions, all of it lives at the property level. Each property has its own independent reporting, its own event definitions, its own key events.
Below the property is the Data Stream. This is the literal source feeding data into the property. A web stream is your website. If a business also had an iOS app and an Android app tied to the same overall business, those would be separate streams, but they could all feed into the same property, giving a combined view of app and web behavior for the same audience. This is actually one of GA4’s genuinely useful structural features compared to the old system, where web and app lived in completely separate tools.
| Level | What it is | Example |
|---|---|---|
| Account | Top-level container, can hold multiple properties | “ADM Education” |
| Property | Represents one business, app, or site | “admeducation.com” |
| Data Stream | The actual source feeding data in (web, iOS, Android) | “admeducation.com – Web” |
Here’s where people mess this up, and it happens constantly. They create a brand new property for every subdomain (a blog subdomain, a store subdomain), splitting data that should have stayed together for a unified view of the same visitor journey. Or the opposite mistake, cramming two genuinely unrelated businesses into one property because it seemed easier at setup time, then six months later needing separate reporting for each and realizing there’s no clean way to split historical data apart after the fact, because it was never separated at the source.
A rough rule that holds up well in practice: one property per distinct business or brand that needs its own independent reporting and its own conversion definitions. Subdomains of the same business (a blog at blog.example.com, a store at shop.example.com) usually belong in the same property, as separate data streams if needed, not separate properties. Getting this right at the start, even if it takes a few extra minutes of thinking, saves a full migration headache later. Nobody enjoys migrating historical analytics data. Nobody.
Step-by-Step Guide on How to Set Up Google Analytics
Alright, actual setup starts now.
Head to analytics.google.com and sign in with the Google account chosen earlier. If this is the very first time using Analytics with that account, there’ll be a prompt to start measuring. Click it.
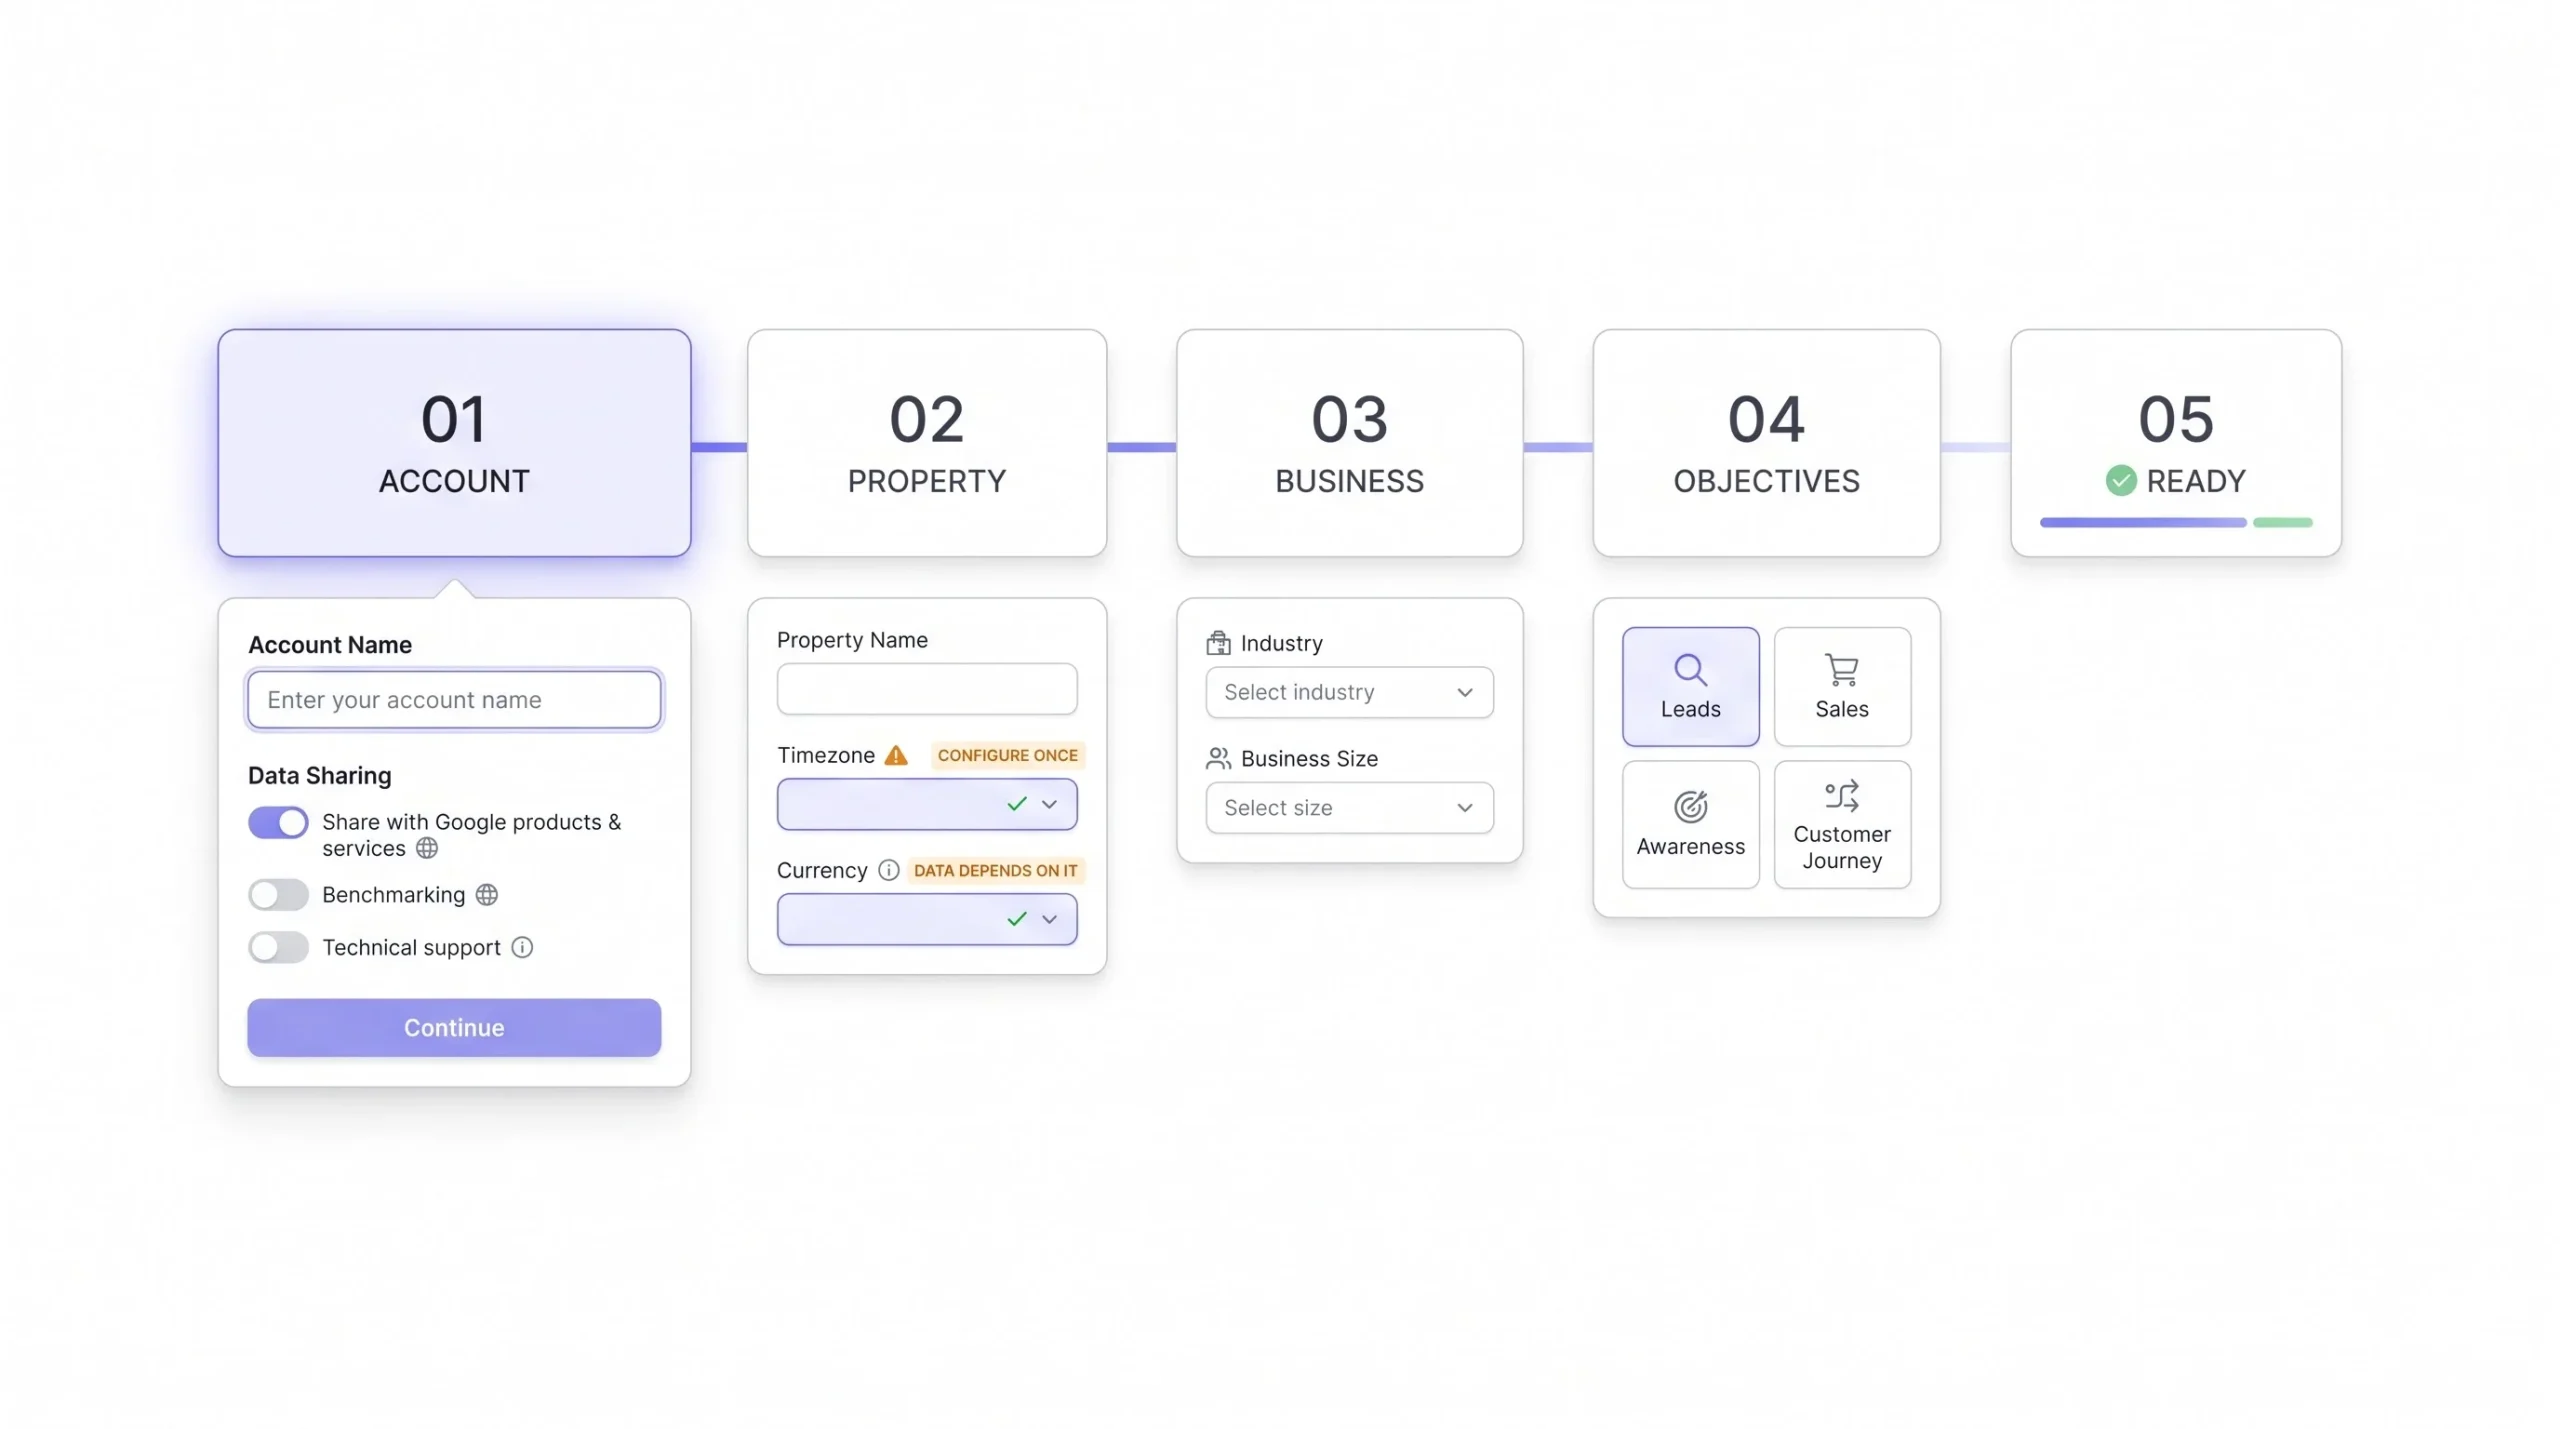
Creating the account. First thing asked is an account name. Use something recognizable, usually the business or organization name, not the website name. This matters if that account ever grows to hold multiple properties, since the account name is what shows up when switching between different businesses later.
Right after naming, there are data sharing settings, a handful of toggles asking whether to share data with Google for benchmarking, technical support, account specialists, and product research. None of these affect your actual tracking or what data other businesses can see about you. They’re about whether Google can use your anonymized, aggregated data for its own purposes, like generating industry benchmarking averages other users can compare themselves against. Leave them on if that doesn’t bother anyone, turn them off if it does. Either way, this toggle has zero impact on how your own site gets tracked or how your own reports look.
Setting up the property. Next screen asks for the property name (usually the website name works fine here), reporting timezone, and currency. This part looks like a formality but it genuinely isn’t. The timezone determines how GA4 buckets your data into “days,” which affects every single daily, weekly, and monthly report going forward, and it also affects how Realtime data compares to standard reports if the timezone is off from where your actual audience is. The currency matters the moment you’re tracking any revenue value, ecommerce transactions, or assigning monetary value to key events like form submissions or enrollments.
Business details. GA4 asks for your industry category and business size. This isn’t just paperwork, it shapes some of the automated insights and benchmarking comparisons GA4 surfaces later, comparing your engagement rate or conversion rate against a rough average for businesses in a similar category and size bracket. Pick the closest realistic match rather than something vague.
Business objectives. Last step in this section, GA4 asks what you’re trying to achieve: generate leads, drive online sales, raise brand awareness, understand customer journeys across platforms and devices, or examine user behavior generally. This shapes which report templates and suggested dashboards get shown to you by default when the property first opens. Doesn’t lock you into anything permanently, and can be adjusted later, but picking the closest match now means less manual report building in the early days.
Tip: Get the timezone and currency right the first time. Changing them later does not retroactively fix data that’s already been collected under the wrong settings. That data stays bucketed and valued the way it was originally recorded, and there’s no reprocessing option to fix historical numbers after a correction.
Setting Up Your Data Stream
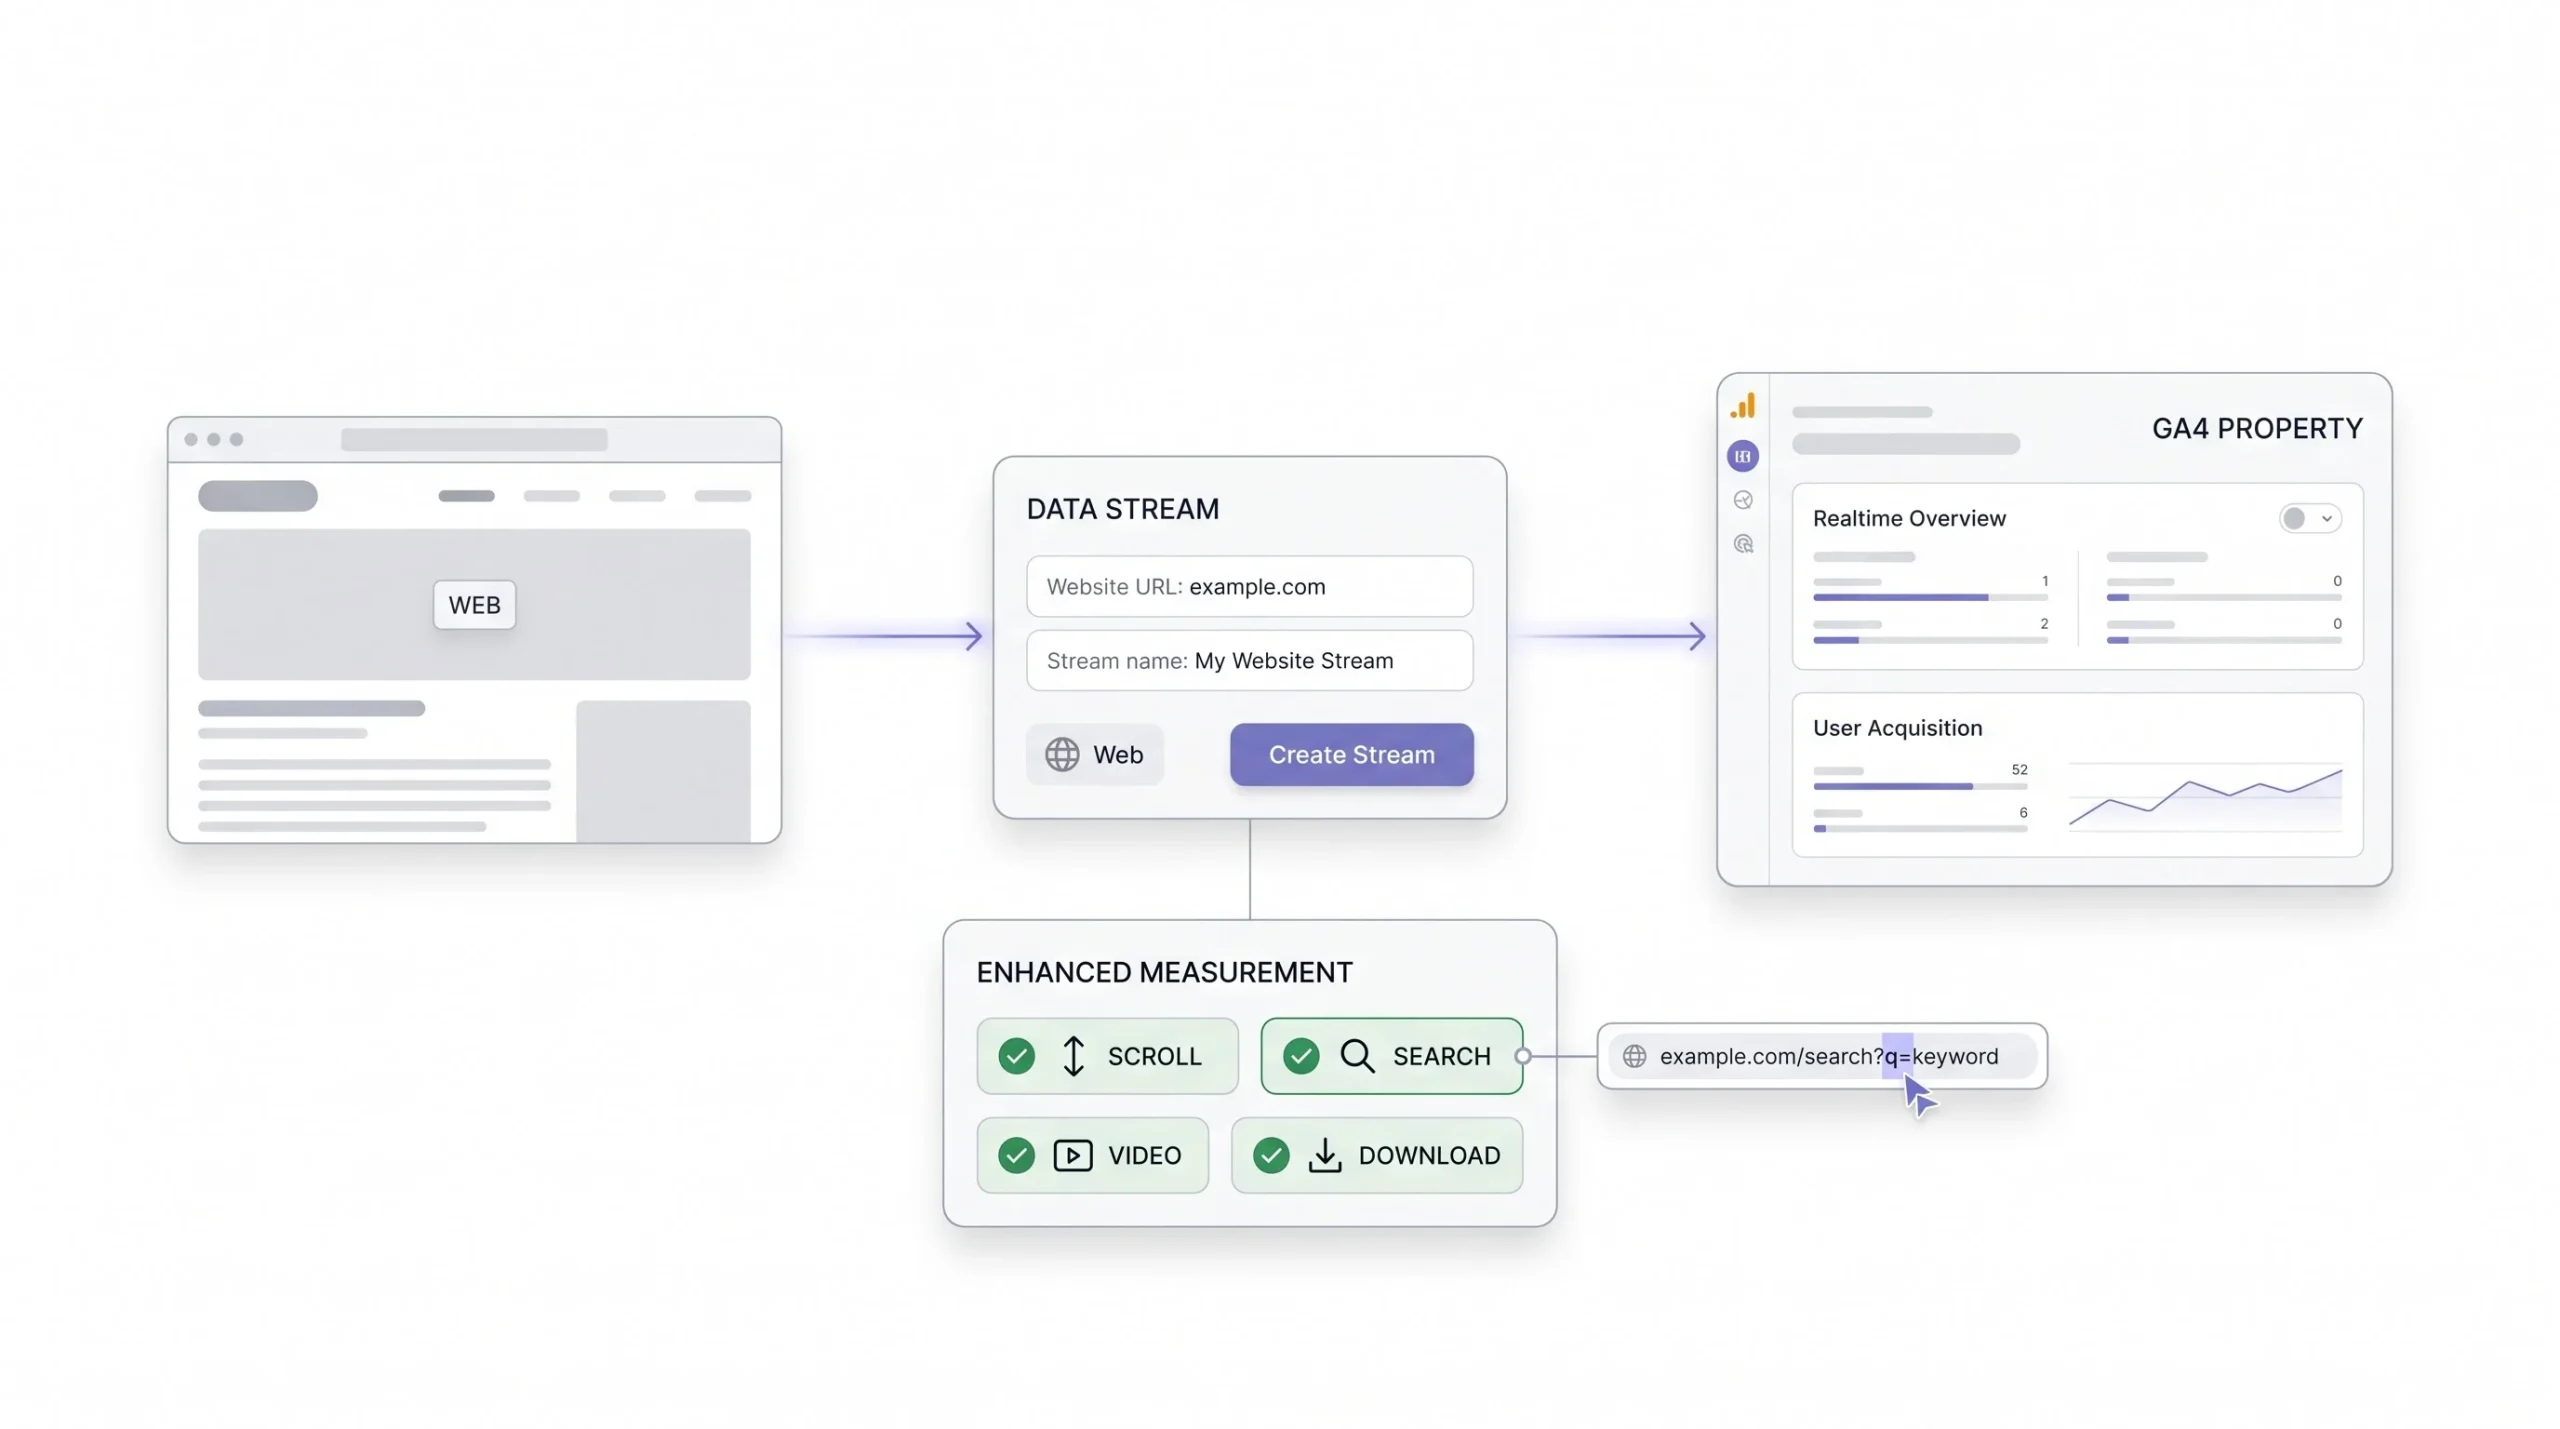
Once the property exists, GA4 asks you to set up a data stream, and for a website, that means a web stream.
A data stream is basically the pipe connecting your actual website to the GA4 property. Without it, the property exists as an empty shell with nothing feeding into it. Enter your website URL, give the stream a name (something like “Main Website” or the domain name itself works fine, doesn’t need to be clever), and create it.
Right after creating the stream, GA4 shows something called Enhanced Measurement, a set of toggles for automatically tracking common interactions without writing any extra code. This is genuinely useful, and it’s also where a lot of beginners get confused later, wondering why certain events already show up in their reports without them “setting anything up.” Now you’ll know why.
| Event | What triggers it | Useful for |
|---|---|---|
| Scroll | User reaches roughly 90% of a page’s height | Content engagement, spotting pages people don’t finish reading |
| Outbound click | Click on a link pointing to an external domain | Affiliate and referral tracking, partner link performance |
| Site search | A query is entered through the site’s internal search bar (requires a recognizable query parameter) | UX and content gap analysis, seeing what people can’t find |
| Video engagement | Interactions with embedded YouTube videos specifically (start, progress, complete) | Content performance, gauging whether video content actually gets watched |
| File download | Click on links pointing to common file types like PDF, DOCX, XLSX, ZIP | Lead magnet and resource download tracking |
Leave enhanced measurement on unless there’s a specific, deliberate reason not to. Most sites benefit from having these baseline events tracked automatically rather than rebuilding the same tracking manually through custom events, which would just be duplicating work GA4 already does for free.
One thing worth knowing: enhanced measurement’s site search detection relies on recognizing a query parameter in the URL, commonly things like ?s= or ?q=. If a site’s internal search uses something unusual, GA4 might not catch it automatically, and that’s a case where checking the actual URL structure of a search results page is worth doing before assuming search tracking is working.
Getting Your Measurement ID and Installing the Tracking Code
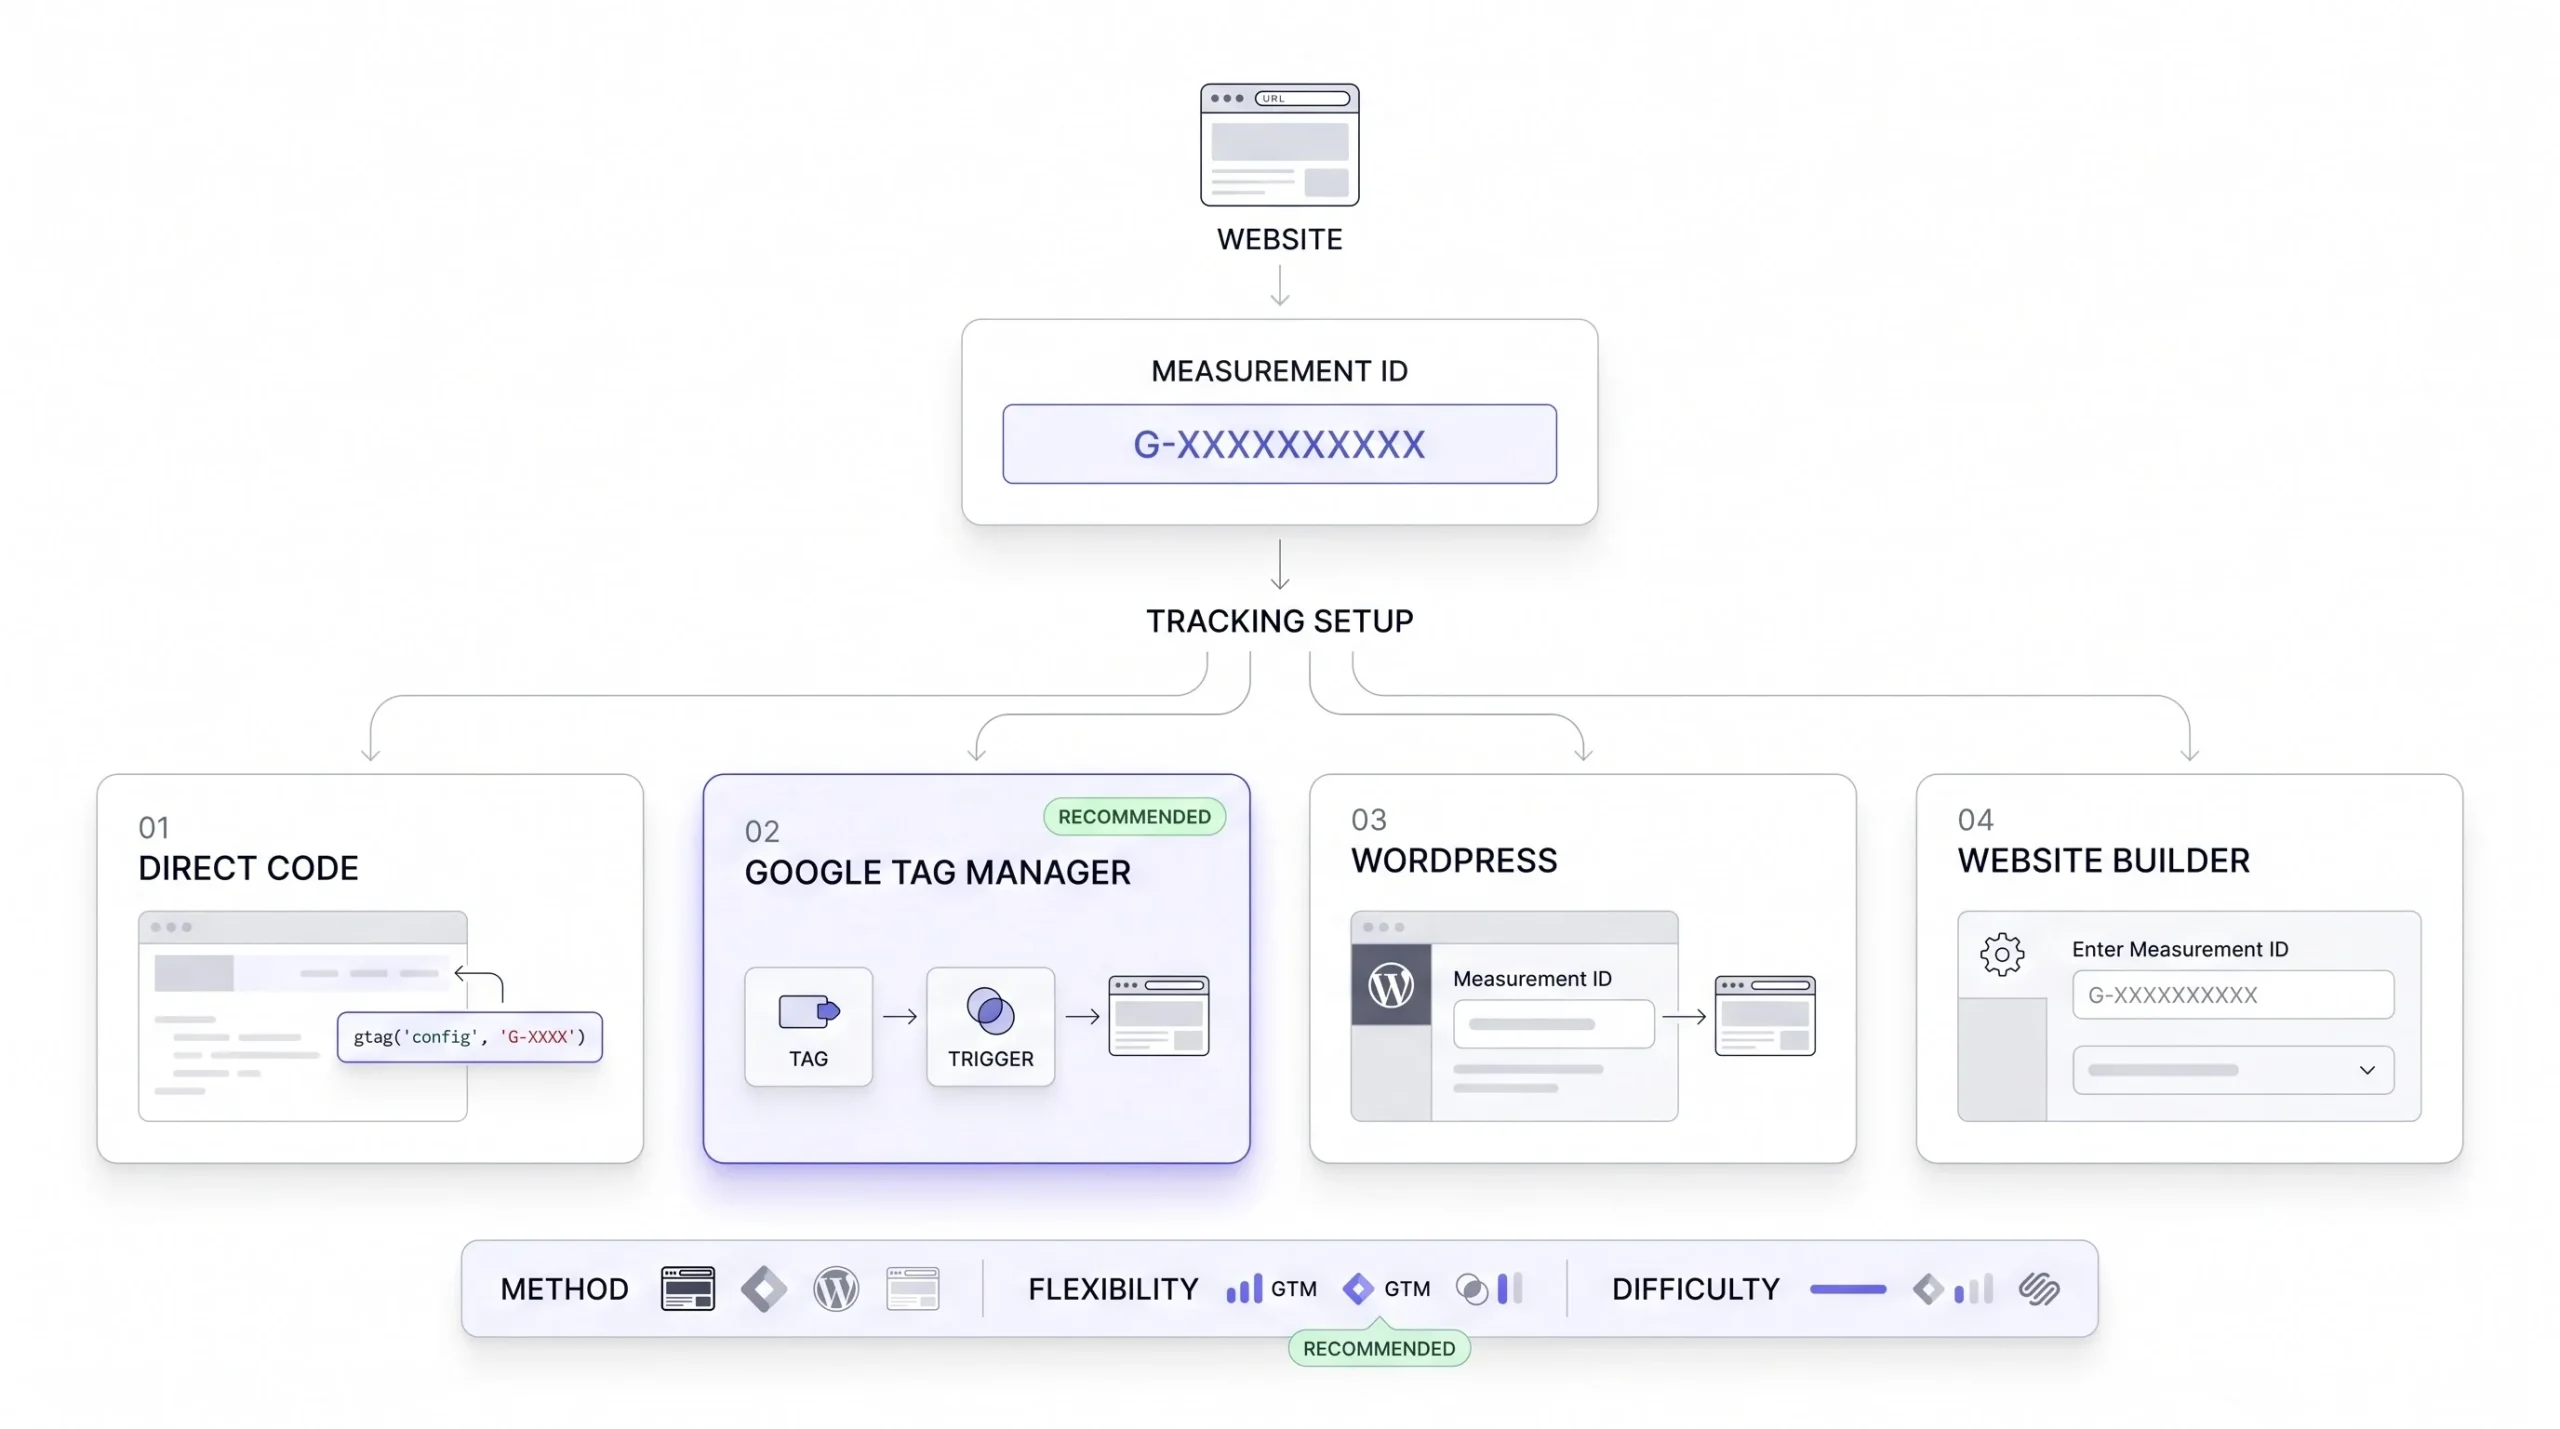
This is the part where GA4 actually starts collecting data, and also where most setup mistakes happen. So this section goes deep, because half-installed tracking is worse than no tracking at all. No tracking, you know you have nothing. Half-installed tracking gives you numbers that look plausible, and you build decisions on top of them without realizing they’re wrong.
Once the data stream is created, GA4 shows a Measurement ID, formatted like G-XXXXXXXXXX. This ID is what connects your website’s code to this specific property and stream. Every installation method below ultimately uses this ID somewhere, whether pasted directly or referenced inside a tag manager configuration.
Method 1: Direct gtag.js installation
GA4 gives you a snippet of JavaScript code to paste directly into the <head> section of every page on your site, ideally as close to the top of the head tag as possible so it loads early and doesn’t miss early interactions. This works fine for small, simple sites where nothing else needs tracking. The downside shows up the moment you need to add more: if you’re pasting a second tool later, a Meta Pixel, a conversion tracking script for Google Ads, a heatmap tool, you end up with multiple separate code blocks stacked in your header, each one loading independently, each one a separate thing to maintain, debug, and remove later if needed. It gets messy fast, and messy header code is a common cause of slow page load times too, since every script sitting there blocks or delays rendering to some degree.
Method 2: Google Tag Manager
Instead of pasting the GA4 code directly, install one single GTM container snippet on your site (two small pieces of code, one for the head, one right after the opening body tag), and then manage all your tracking tags, including GA4, through the Tag Manager interface without touching your site’s code again for future additions. This is genuinely the better long-term choice for most businesses, especially anyone running paid ads or planning to add more tracking later. Inside GTM, you’d create a new tag, choose “Google Analytics: GA4 Configuration” as the tag type, paste in the Measurement ID, set the trigger to fire on all pages, and publish. The tradeoff is a slightly steeper learning curve upfront, understanding triggers, tags, and variables takes a bit of orientation, but it pays off fast once a second or third tracking tool needs adding, since at that point it’s just a new tag inside the same container instead of another script pasted into the header.
Method 3: WordPress plugins
For WordPress sites specifically, this is usually the easiest and safest path. Google’s own Site Kit by Google plugin connects your GA4 property directly to your WordPress dashboard through an official Google login flow, handling the code installation automatically without any manual header editing. Alternatively, most SEO plugins (and dedicated header and footer script plugins) let you paste the gtag.js snippet into a designated field without touching theme files directly, which is meaningfully safer than editing a theme’s header.php file by hand, since a single typo there can take the whole site down or cause a white screen error. If a theme update later overwrites a manually edited header.php file, the tracking code disappears with it too, which is another reason plugin-based installs tend to hold up better over time.
Method 4: Website builders
Platforms like Shopify, Wix, and Squarespace have their own native fields for adding a Google Analytics Measurement ID, usually somewhere under settings, marketing, or integrations menus. These are the simplest installs of all, paste the Measurement ID into a designated field and the platform handles the technical implementation behind the scenes. Less flexible if custom event tracking is needed later, since these platforms often restrict how much code you can inject directly, but for a straightforward brochure site or simple store, it works fine without extra setup.
| Method | Best for | Flexibility | Setup difficulty |
|---|---|---|---|
| Direct gtag.js | Simple sites, one-off tracking | Low | Easy |
| Google Tag Manager | Sites needing multiple tags or events | High | Medium |
| WordPress plugin | Non-technical WordPress users | Medium | Easy |
| Website builder native integration | Shopify, Wix, Squarespace | Low to medium | Very easy |
Tip: If you’re already running a Meta Pixel or planning Google Ads conversion tracking, install everything through Google Tag Manager instead of hardcoding separate scripts. One container, way easier to debug when something breaks, and no risk of multiple independent scripts conflicting with each other or slowing down page load in ways that are hard to trace back to a specific tag.
Verifying Your Installation Is Actually Working
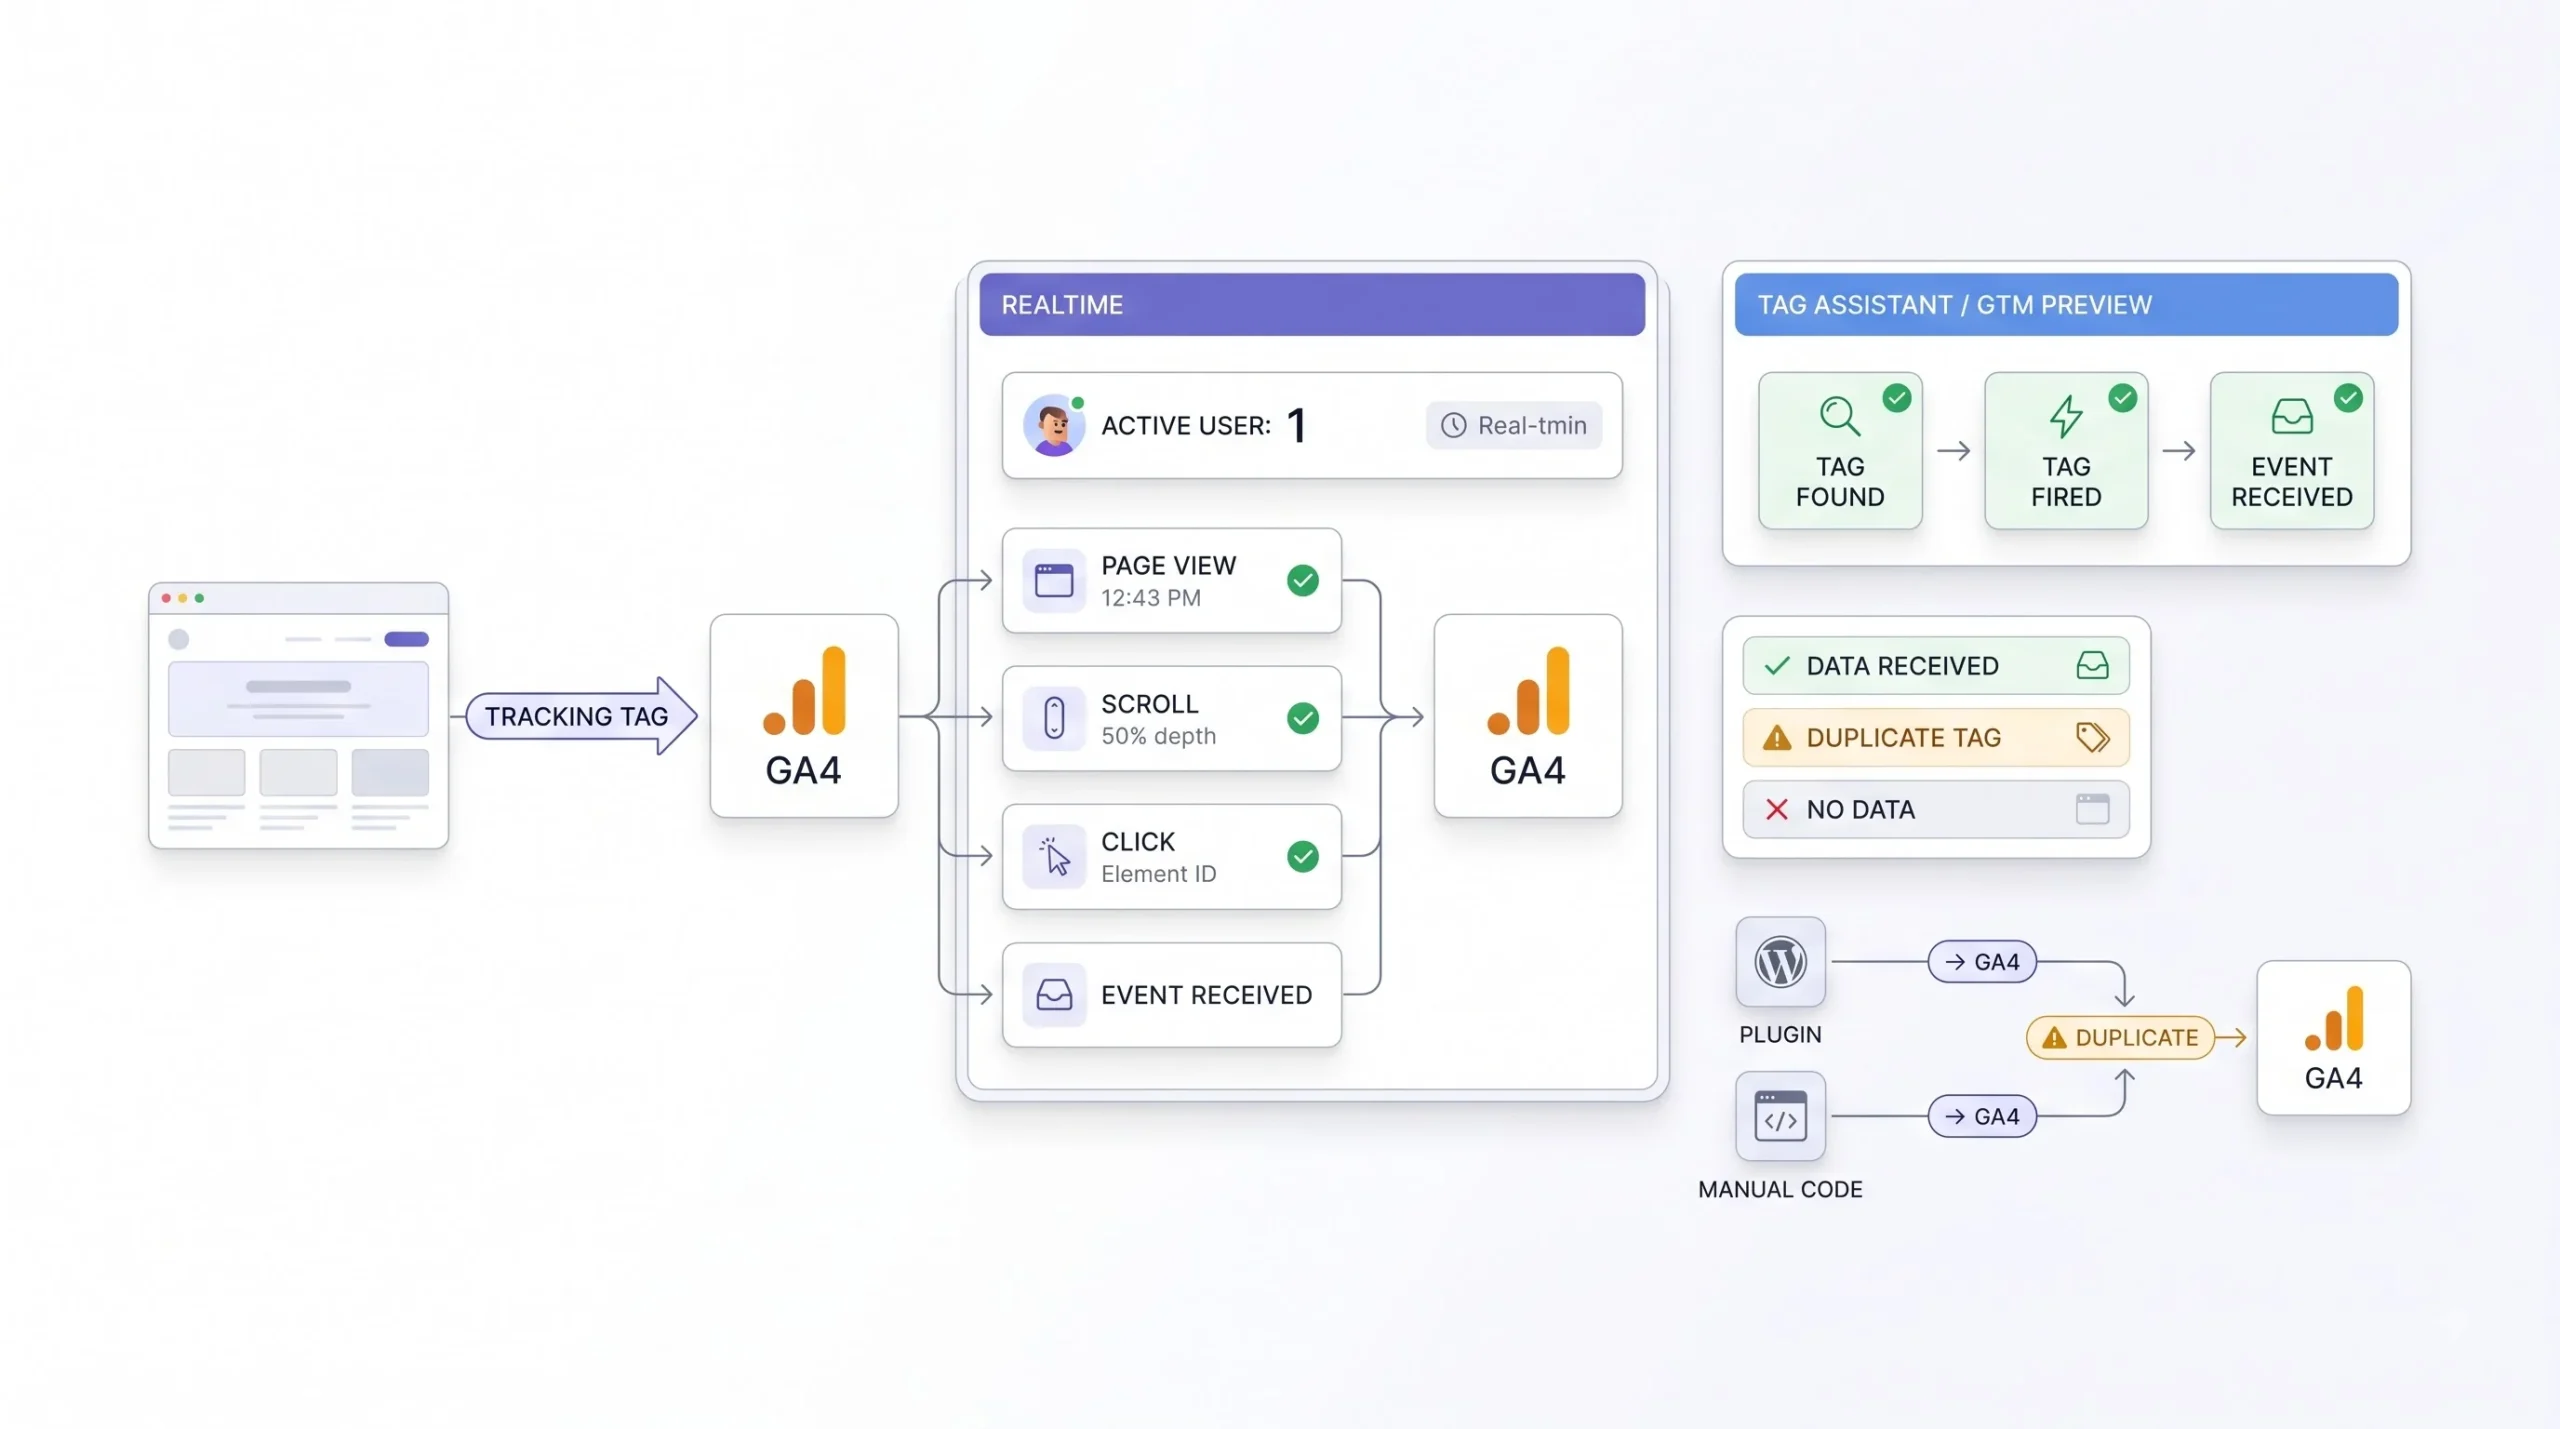
Here’s a mistake that happens constantly: someone installs the tracking code, sees a setup wizard say “success” or “tag detected,” and just assumes it’s fully done. Then a month later they open GA4 and there’s barely any data, or worse, weirdly duplicated numbers, and they have no idea when things actually broke, because nobody checked properly at the time of installation.
Don’t skip verification. It takes five minutes and saves weeks of decisions built on bad data.
Realtime report. Inside GA4, go to Reports, then Realtime. Open your website in another browser tab or an incognito window, click around a few pages, maybe scroll down one of them. Within a minute or so, you should see yourself show up as an active user in the Realtime report, along with the events firing as you interact, page views, scrolls, whatever enhanced measurement caught. If nothing shows up after a couple of minutes, the tracking code isn’t firing correctly, and something in the installation needs fixing before moving forward to anything else.
Tag Assistant or GTM Preview mode. If you installed via Google Tag Manager, use GTM’s built-in Preview mode, found by clicking Preview inside the GTM workspace. It opens a debugging panel in a new tab showing exactly which tags fired on which page, in what order, and with what data attached, which is incredibly useful for catching a tag that’s technically present in the container but not actually triggering under the right conditions. Google’s Tag Assistant browser extension works similarly for sites without GTM, checking whether the GA4 tag is present on a page and firing as expected, flagging errors if something looks off.
Common problems and what they usually look like once you dig in:
| Symptom | Likely cause | Fix |
|---|---|---|
| No data in Realtime | Code not firing, wrong Measurement ID pasted, or a browser ad blocker interfering during the test | Recheck the snippet placement and the ID, test in incognito with extensions disabled |
| Duplicate pageviews | Tracking code installed twice, often a plugin plus manual code both active at once | Remove the duplicate tag, keep only one active install |
| Data appears with a delay of a day or two | Normal behavior for standard, non-Realtime reports | Wait it out, this isn’t a bug, it’s how GA4 processes data |
| Events not showing up | Enhanced measurement toggle switched off, or a custom event misconfigured in GTM | Recheck the data stream settings, and check the trigger conditions in GTM if applicable |
| Bot or internal traffic inflating numbers | No filter excluding internal team visits or known bot traffic | Set up internal traffic filters and rely on GA4’s built-in bot filtering |
Duplicate installs are genuinely one of the most common issues out there, especially on WordPress sites where someone installs a plugin for GA4 and then also manually pastes the code into the theme header, not realizing both are now active simultaneously. Always check for this specifically, it’s an easy thing to overlook because both installs “work,” they just work twice.
Setting Up Events and Conversions
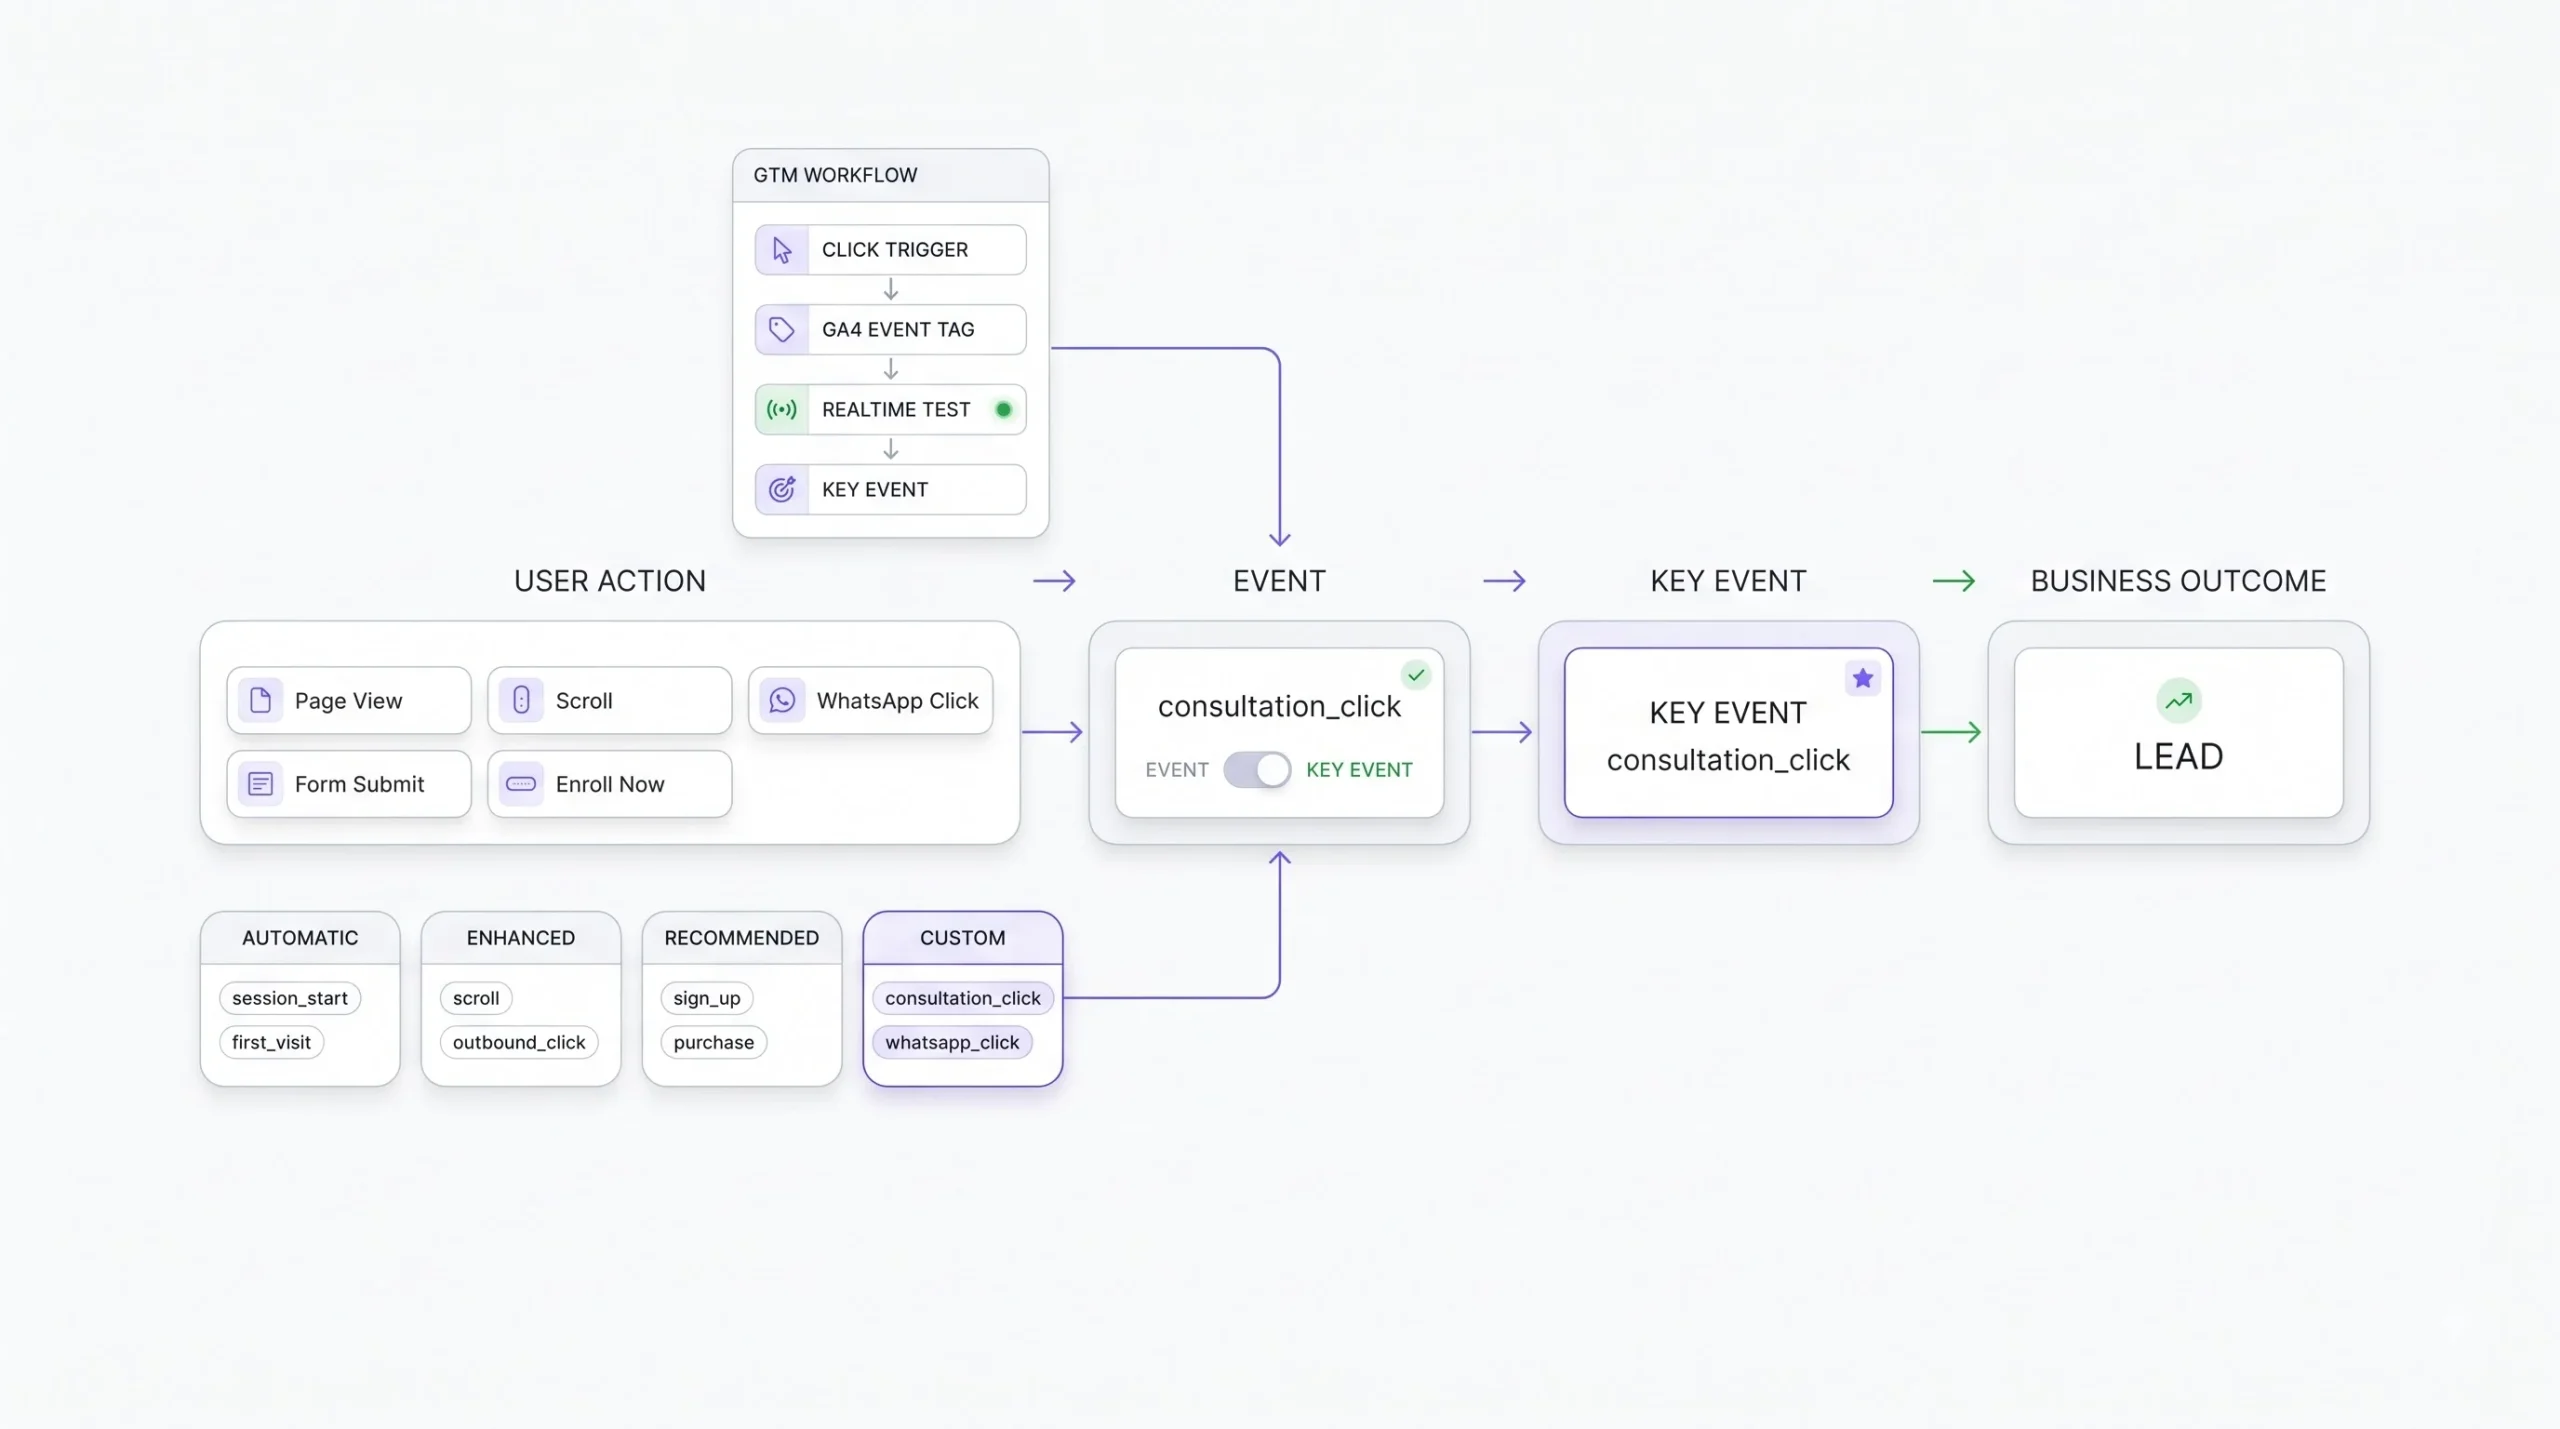
This is where GA4 starts earning its keep, because raw traffic numbers don’t tell you much on their own. What matters is what people actually do once they land on the site, and in what sequence.
Remember from earlier, everything in GA4 is an event. But not all events are created the same way, and understanding the differences here clears up a lot of confusion that shows up later when trying to build custom tracking.
Automatically collected events happen without any setup at all, the moment the base tracking code is installed. Things like session_start or first_visit fire the instant someone lands on the site, no configuration required, no toggle to flip.
Enhanced measurement events are the ones covered earlier, scrolls, outbound clicks, video engagement, file downloads, site search. These are toggled on at the data stream level as a group, not built individually one by one.
Recommended events are Google’s suggested event names for common actions like sign_up, login, or purchase. These follow specific naming conventions and parameter structures Google recommends, so that GA4’s built-in reports and integrations, particularly ecommerce reporting, recognize and organize them correctly. Using Google’s exact recommended naming (rather than inventing your own name for the same action) means these events plug into existing report templates instead of showing up as unlabeled custom data. You implement these yourself, either through direct code changes or through Google Tag Manager.
Custom events are anything specific to a business that doesn’t fit the categories above. A course enrollment click. A WhatsApp chat click. A specific form on a specific landing page. These get built manually, and this is usually where the real value sits for service and education businesses, because the events that actually predict revenue are rarely the generic, automatically tracked ones.
| Type | Examples | Setup method |
|---|---|---|
| Automatically collected | Session start, first visit | No setup needed |
| Enhanced measurement | Scroll, outbound click | Toggle on or off |
| Recommended events | Sign_up, purchase | Implement using Google’s naming convention |
| Custom events | Anything business-specific | Google Tag Manager or gtag code |
For most service-based or education businesses, the events that actually matter aren’t generic pageviews, they’re specific actions tied directly to leads. Things like a contact form submission, a click on a WhatsApp number, a click-to-call on a phone number, or a click on an “Enroll Now” button for a specific course. These can all be built as custom events inside Google Tag Manager using click triggers, targeting a specific button ID, class, or link text, without touching the website’s actual code, which is a big part of why GTM is worth the initial learning curve for anyone serious about lead tracking rather than just traffic counting.
A practical example of how this actually gets built: say there’s a “Book a Free Consultation” button on a service page. Inside GTM, you’d create a trigger set to “Click – All Elements,” narrowed down to fire only when the click matches that specific button (by its CSS selector or click text). Then a tag gets created using the “Google Analytics: GA4 Event” tag type, referencing the base GA4 configuration tag, given an event name like consultation_click, and connected to that trigger. Publish the container, test it in Preview mode by actually clicking the button, confirm it shows up correctly in Realtime under that event name, and it’s live.
Once an event is set up and confirmed working, one more step turns it into something genuinely useful for reporting: marking it as a key event. Inside GA4, go to Admin, then Events, find the event in the list, and toggle “Mark as key event.” Once marked, that event starts showing up in dedicated conversion reporting and, importantly, becomes available for import into Google Ads if paid campaigns are running, directly affecting how the ad platform optimizes toward real business outcomes instead of just clicks or landing page views.
Linking GA4 with Other Google Tools
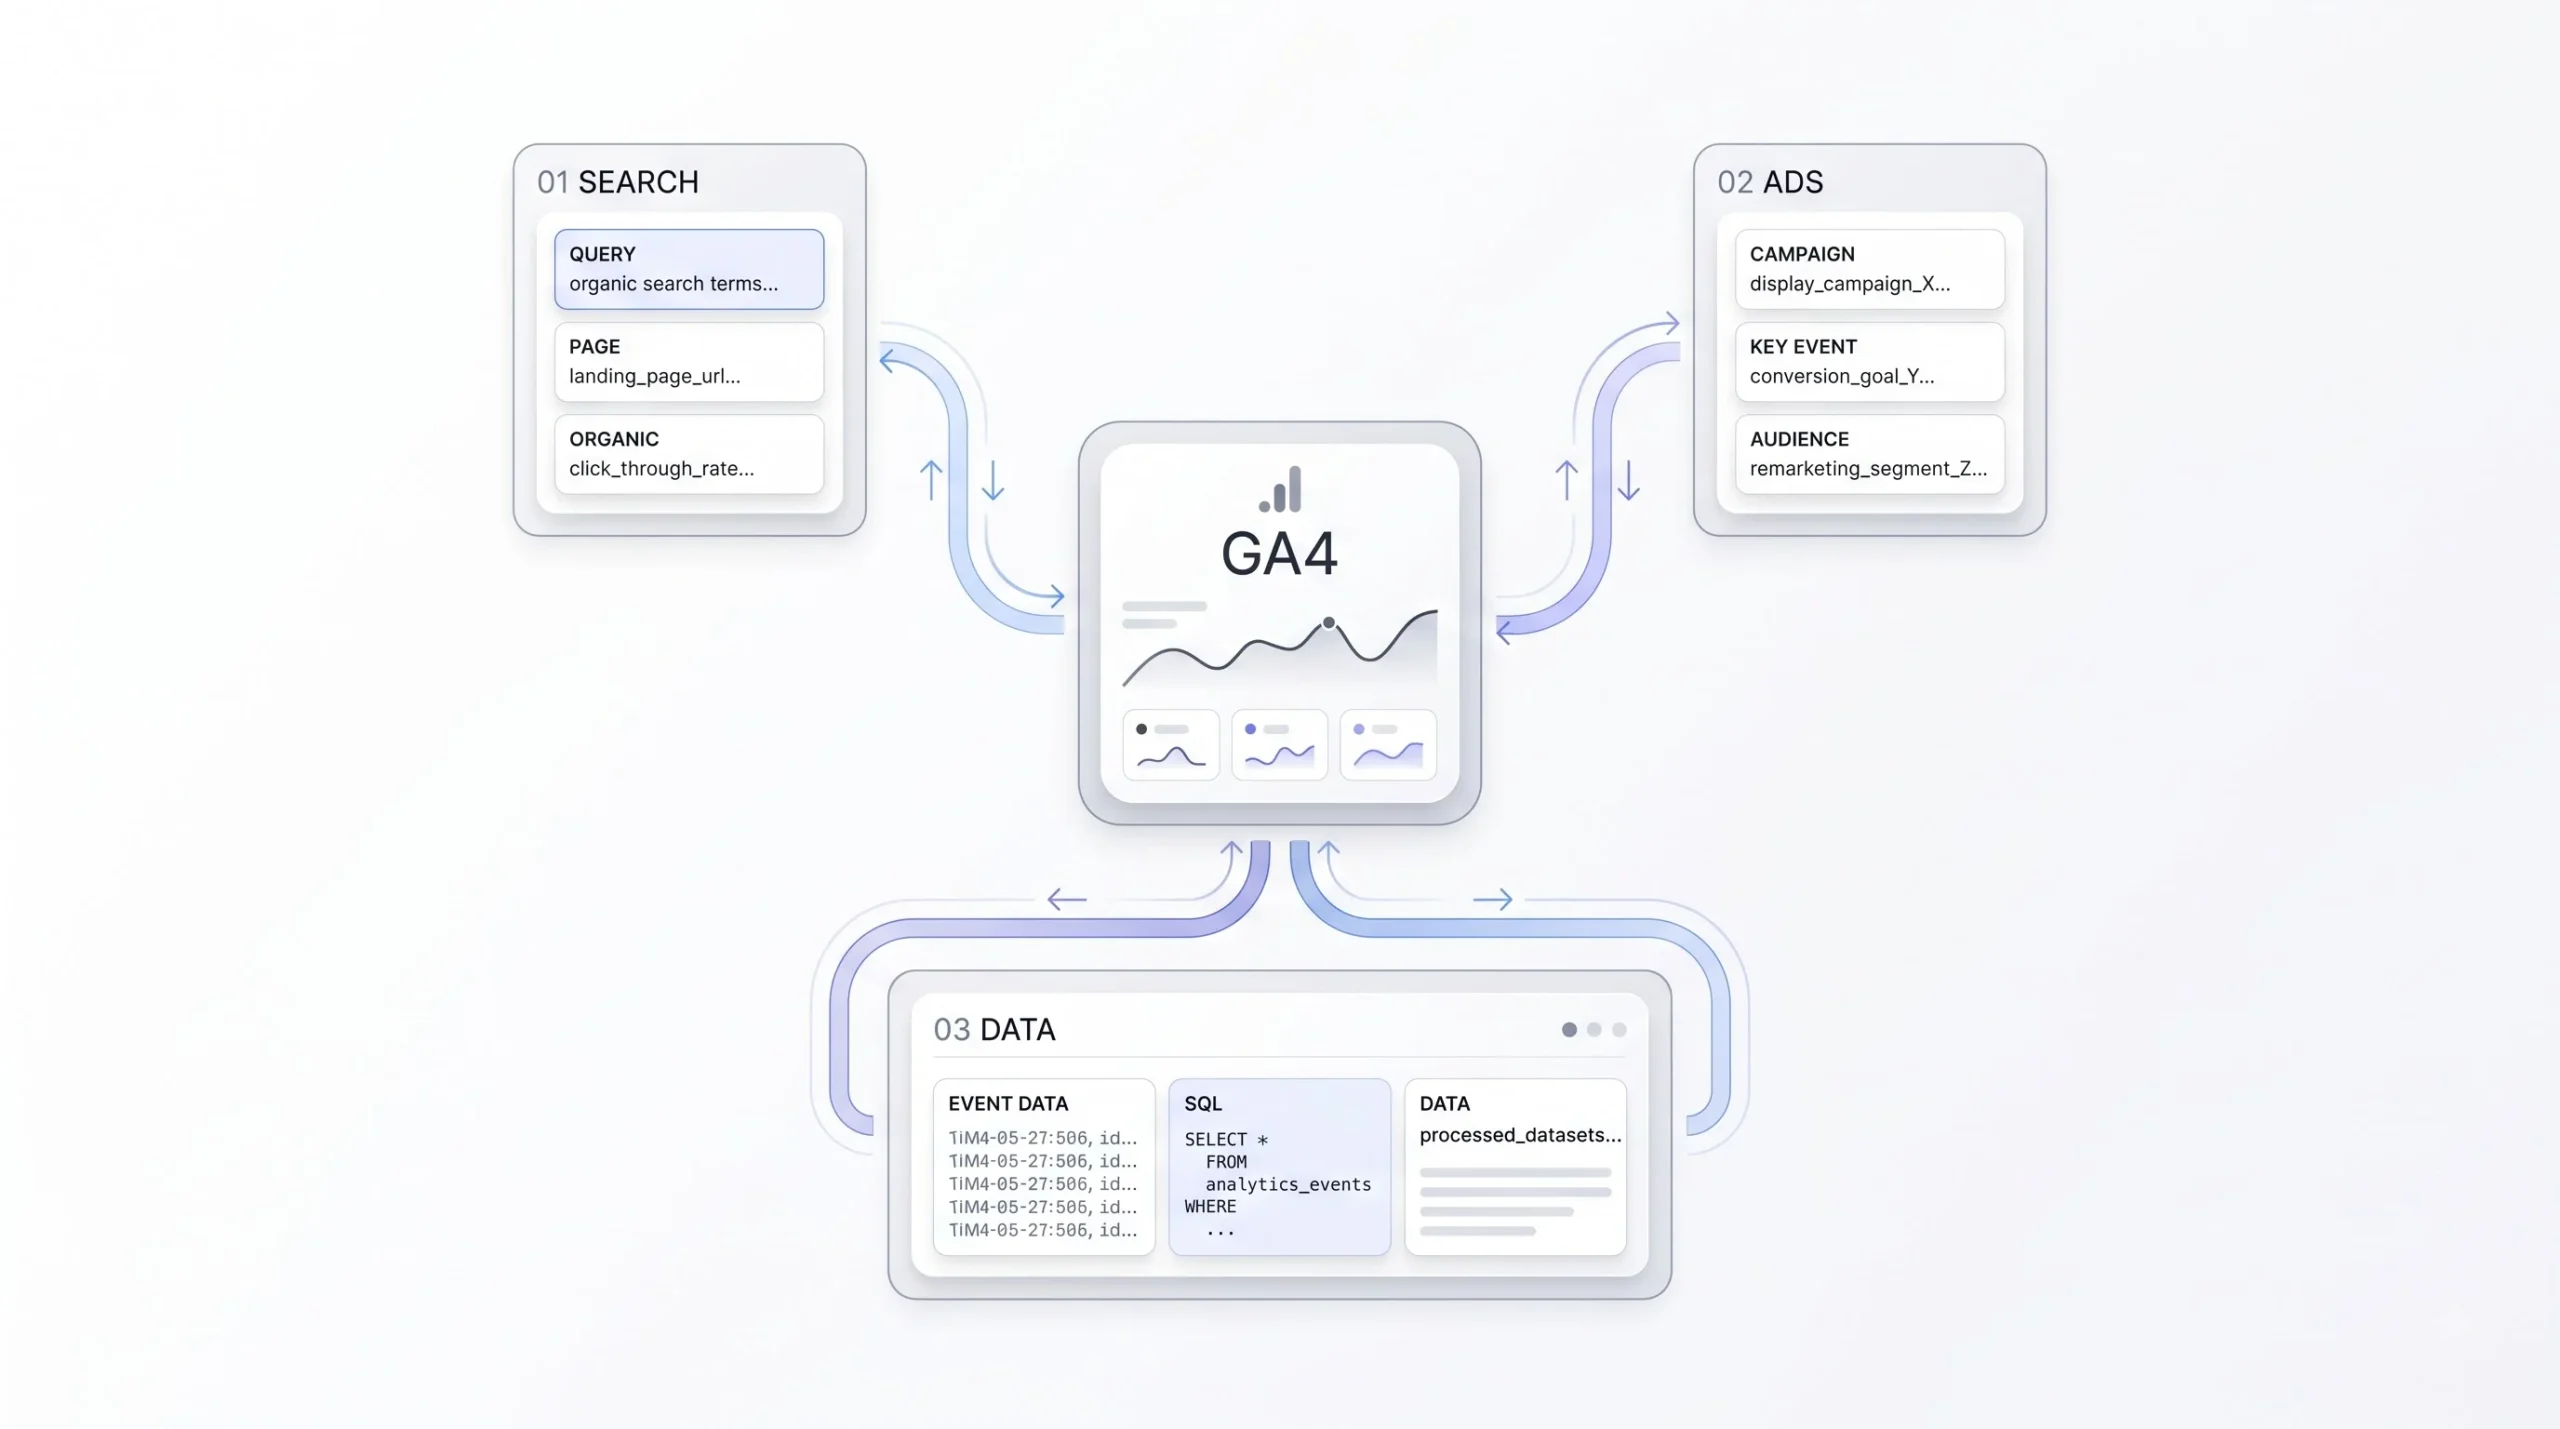
GA4 gets substantially more useful once it’s connected to the rest of the Google ecosystem instead of sitting on its own as an isolated dashboard.
Google Search Console. Linking this inside GA4’s Admin settings, under Product Links, unlocks query-level search data directly inside your Analytics reports, showing which actual search terms brought people to specific pages, not just “organic search” as one lumped-together channel. Without this link, organic traffic shows up as a single number with no visibility into the actual search intent behind it. This link takes a couple of minutes to set up, requires that both properties (Search Console and GA4) are verified under the same account or that you have edit access to both, and genuinely changes how useful organic search reporting becomes almost immediately.
Google Ads. If paid campaigns are running, linking Google Ads to GA4 lets you import GA4’s marked key events as conversions directly inside the Ads platform, meaning campaigns can start optimizing bids toward people who actually took a meaningful action, not just clicked an ad. This link also unlocks remarketing audience creation based on real GA4 behavior data, people who visited a specific pricing page, spent over a certain amount of time on a service page, or started filling a form but abandoned it partway through. This is the connection that turns ad spend from a guessing game into something with actual behavioral signal behind it.
BigQuery export. Worth knowing this exists, even if it’s not something to set up on day one. BigQuery lets you export raw, unsampled GA4 event-level data into Google’s cloud data warehouse for advanced analysis, custom SQL queries, or joining analytics data with other business systems like a CRM or sales database. This is genuinely an advanced use case, mostly relevant once a business has someone comfortable writing SQL or a data analyst on the team. Not something to worry about during initial setup, just useful to know the door exists for later, especially since GA4’s free tier does support a daily BigQuery export at no extra cost, unlike the old Universal Analytics setup where this required a paid tier.
Setting Up Goals… I Mean Conversions the GA4 Way
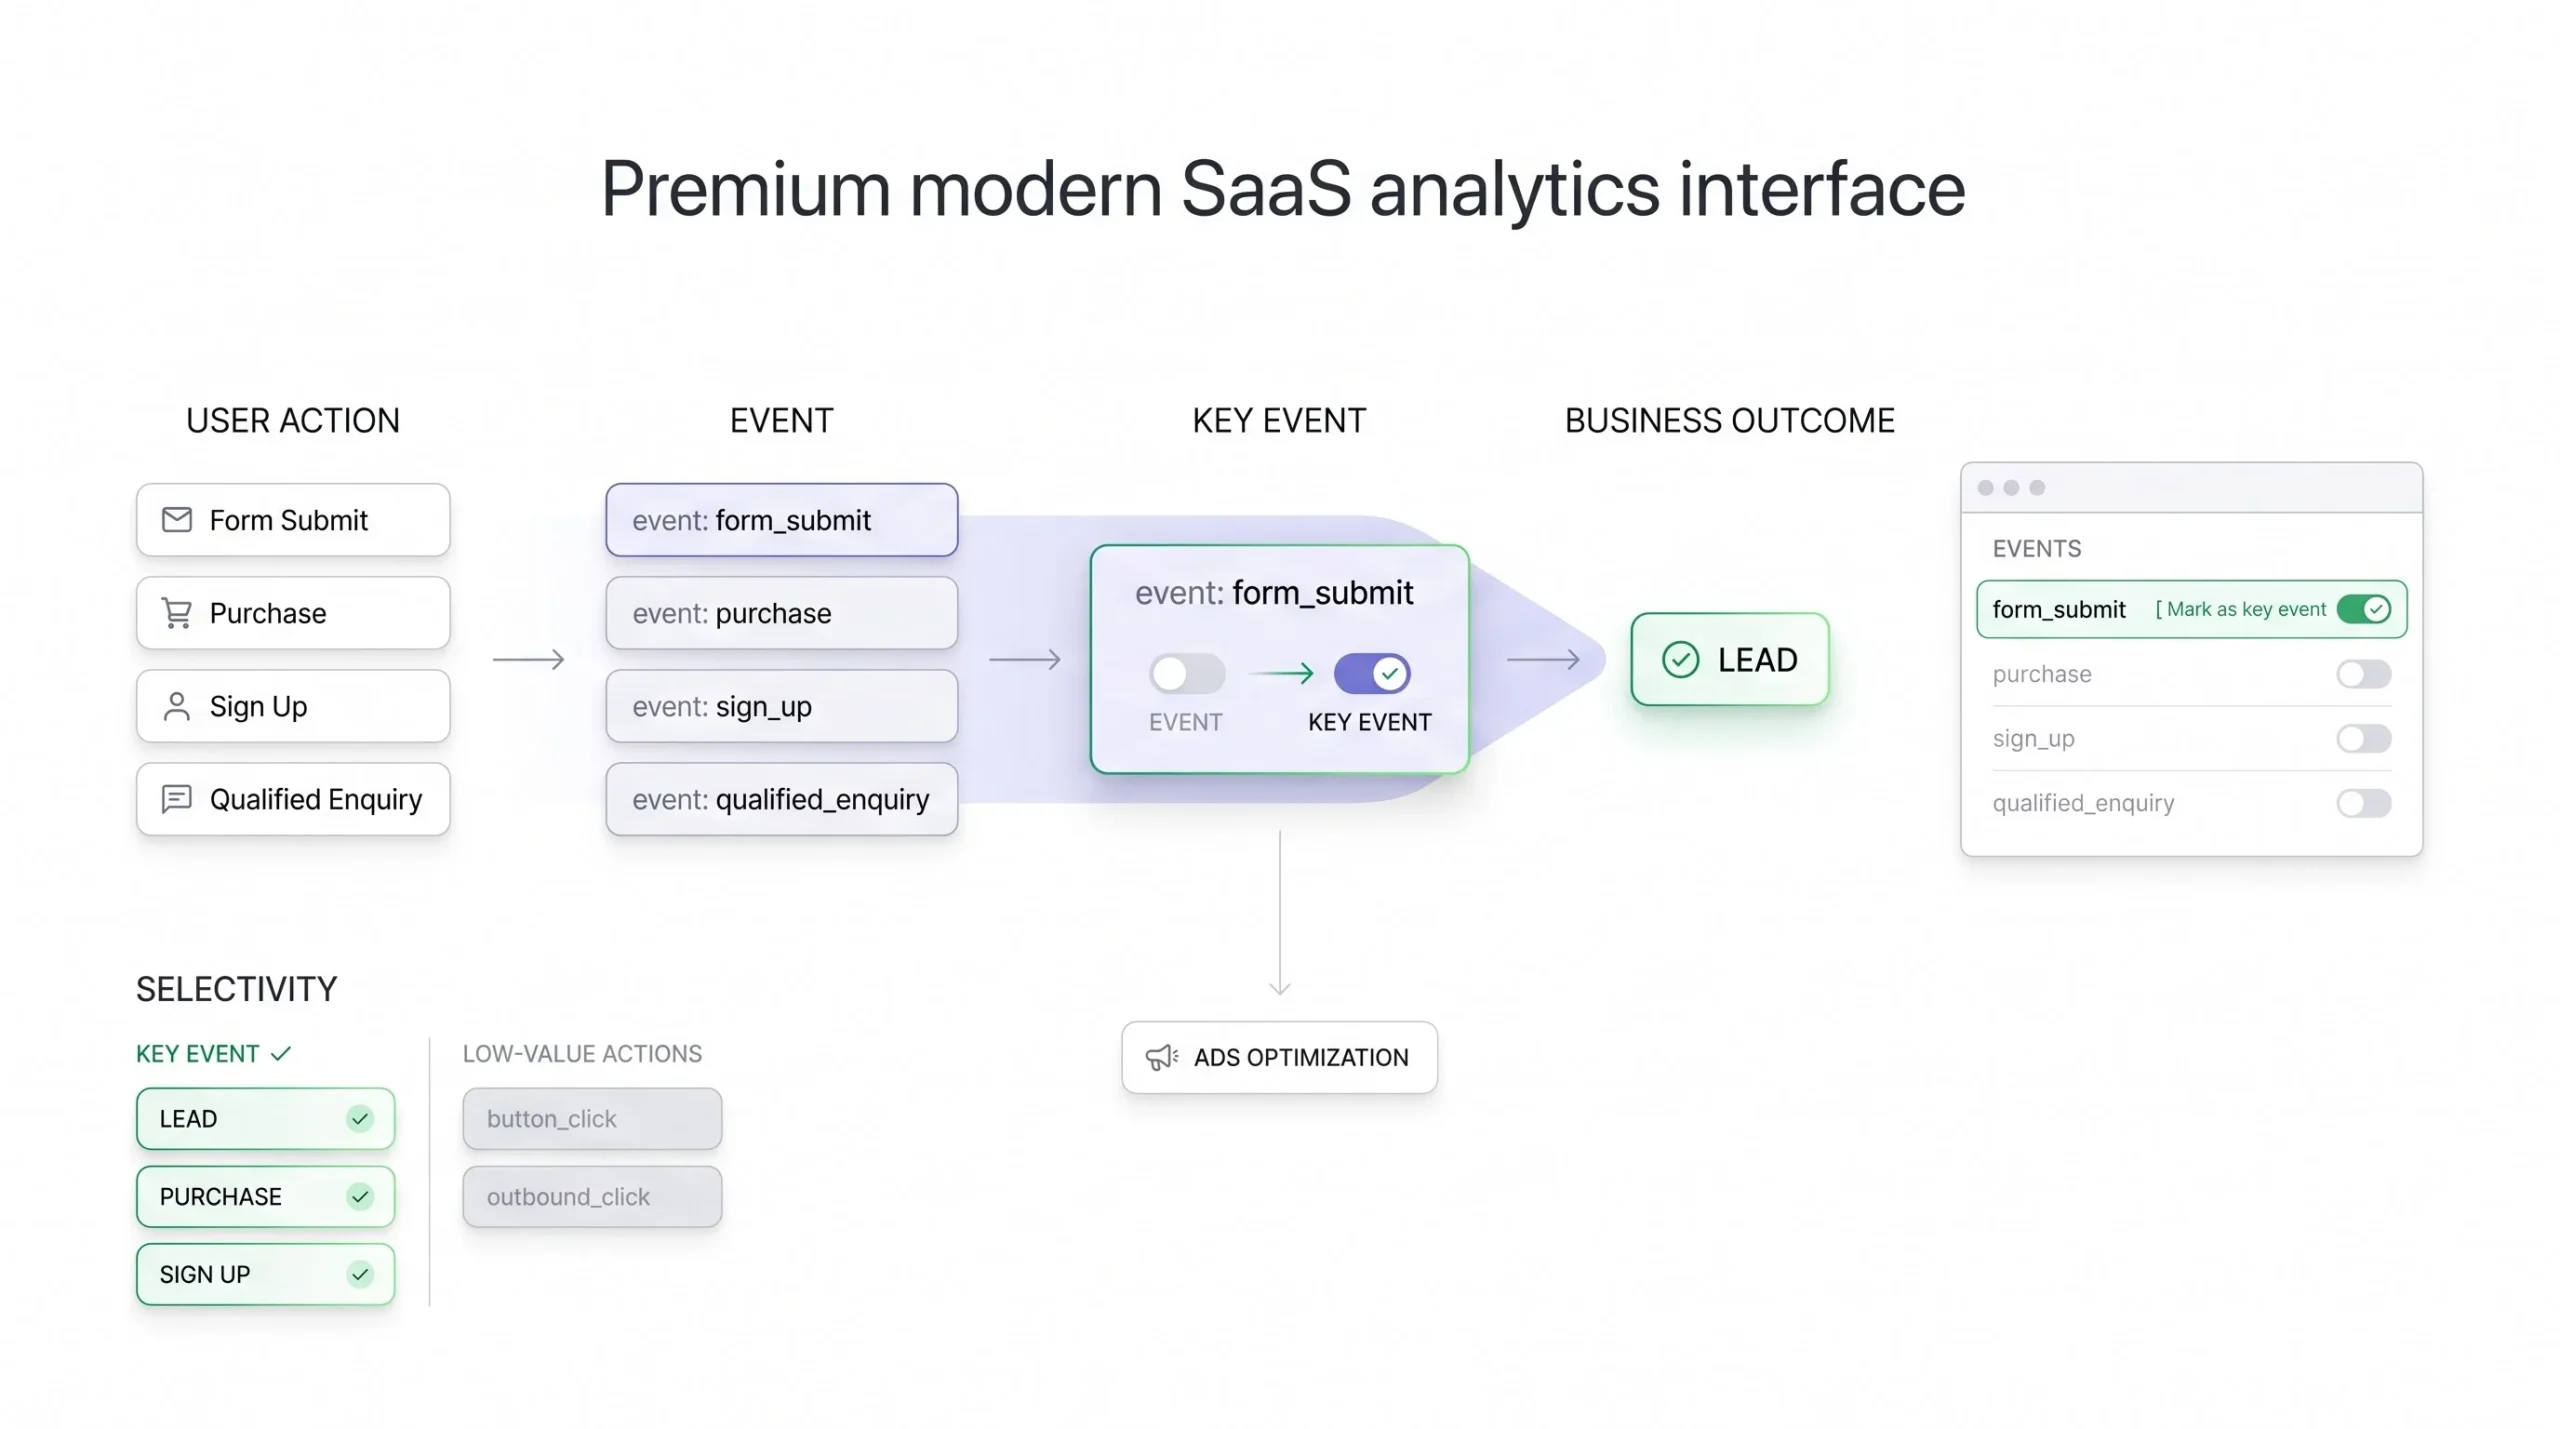
If you’ve used the old Universal Analytics before, you’re probably still thinking in terms of “goals.” That word doesn’t really exist in GA4 anymore, at least not in the same structural sense, and this trips up a lot of returning users searching for a “goals” menu that simply isn’t there.
In GA4, what used to be a “goal” is now a key event. The underlying concept is the same, a specific action considered a meaningful business outcome, but the mechanism behind it changed completely. Instead of building a separate goal configuration with destination URLs, conditions, and funnel steps the way Universal Analytics required, in GA4 you take an event that’s already being tracked, automatic, enhanced, recommended, or custom, and simply flag it as a key event.
The practical steps: confirm the event is firing correctly (check Realtime, exactly as covered earlier), go to Admin, open the Events section under the relevant property, locate the event by its exact name, and switch on “Mark as key event.” That’s genuinely it. No complex funnel builder required just for basic conversion tracking. Once marked, it appears automatically in the dedicated conversions reporting section and becomes available for Google Ads import, as mentioned earlier.
One thing worth noting honestly, because it’s a real trap: because marking key events is this simple, it’s also easy to over-mark things that aren’t actually meaningful conversions, like flagging every single button click or every outbound link as a key event just because the option exists. Be selective here. A key event should represent something that genuinely matters to the business, a lead, a sale, a signup, a qualified enquiry, not just something that happens to be technically trackable. Marking too many things as key events dilutes the conversions report into noise, and it also messes with how Google Ads optimizes if those events get imported, since the algorithm ends up optimizing toward low-value actions mixed in with the real ones.
Basic Privacy and Consent Considerations
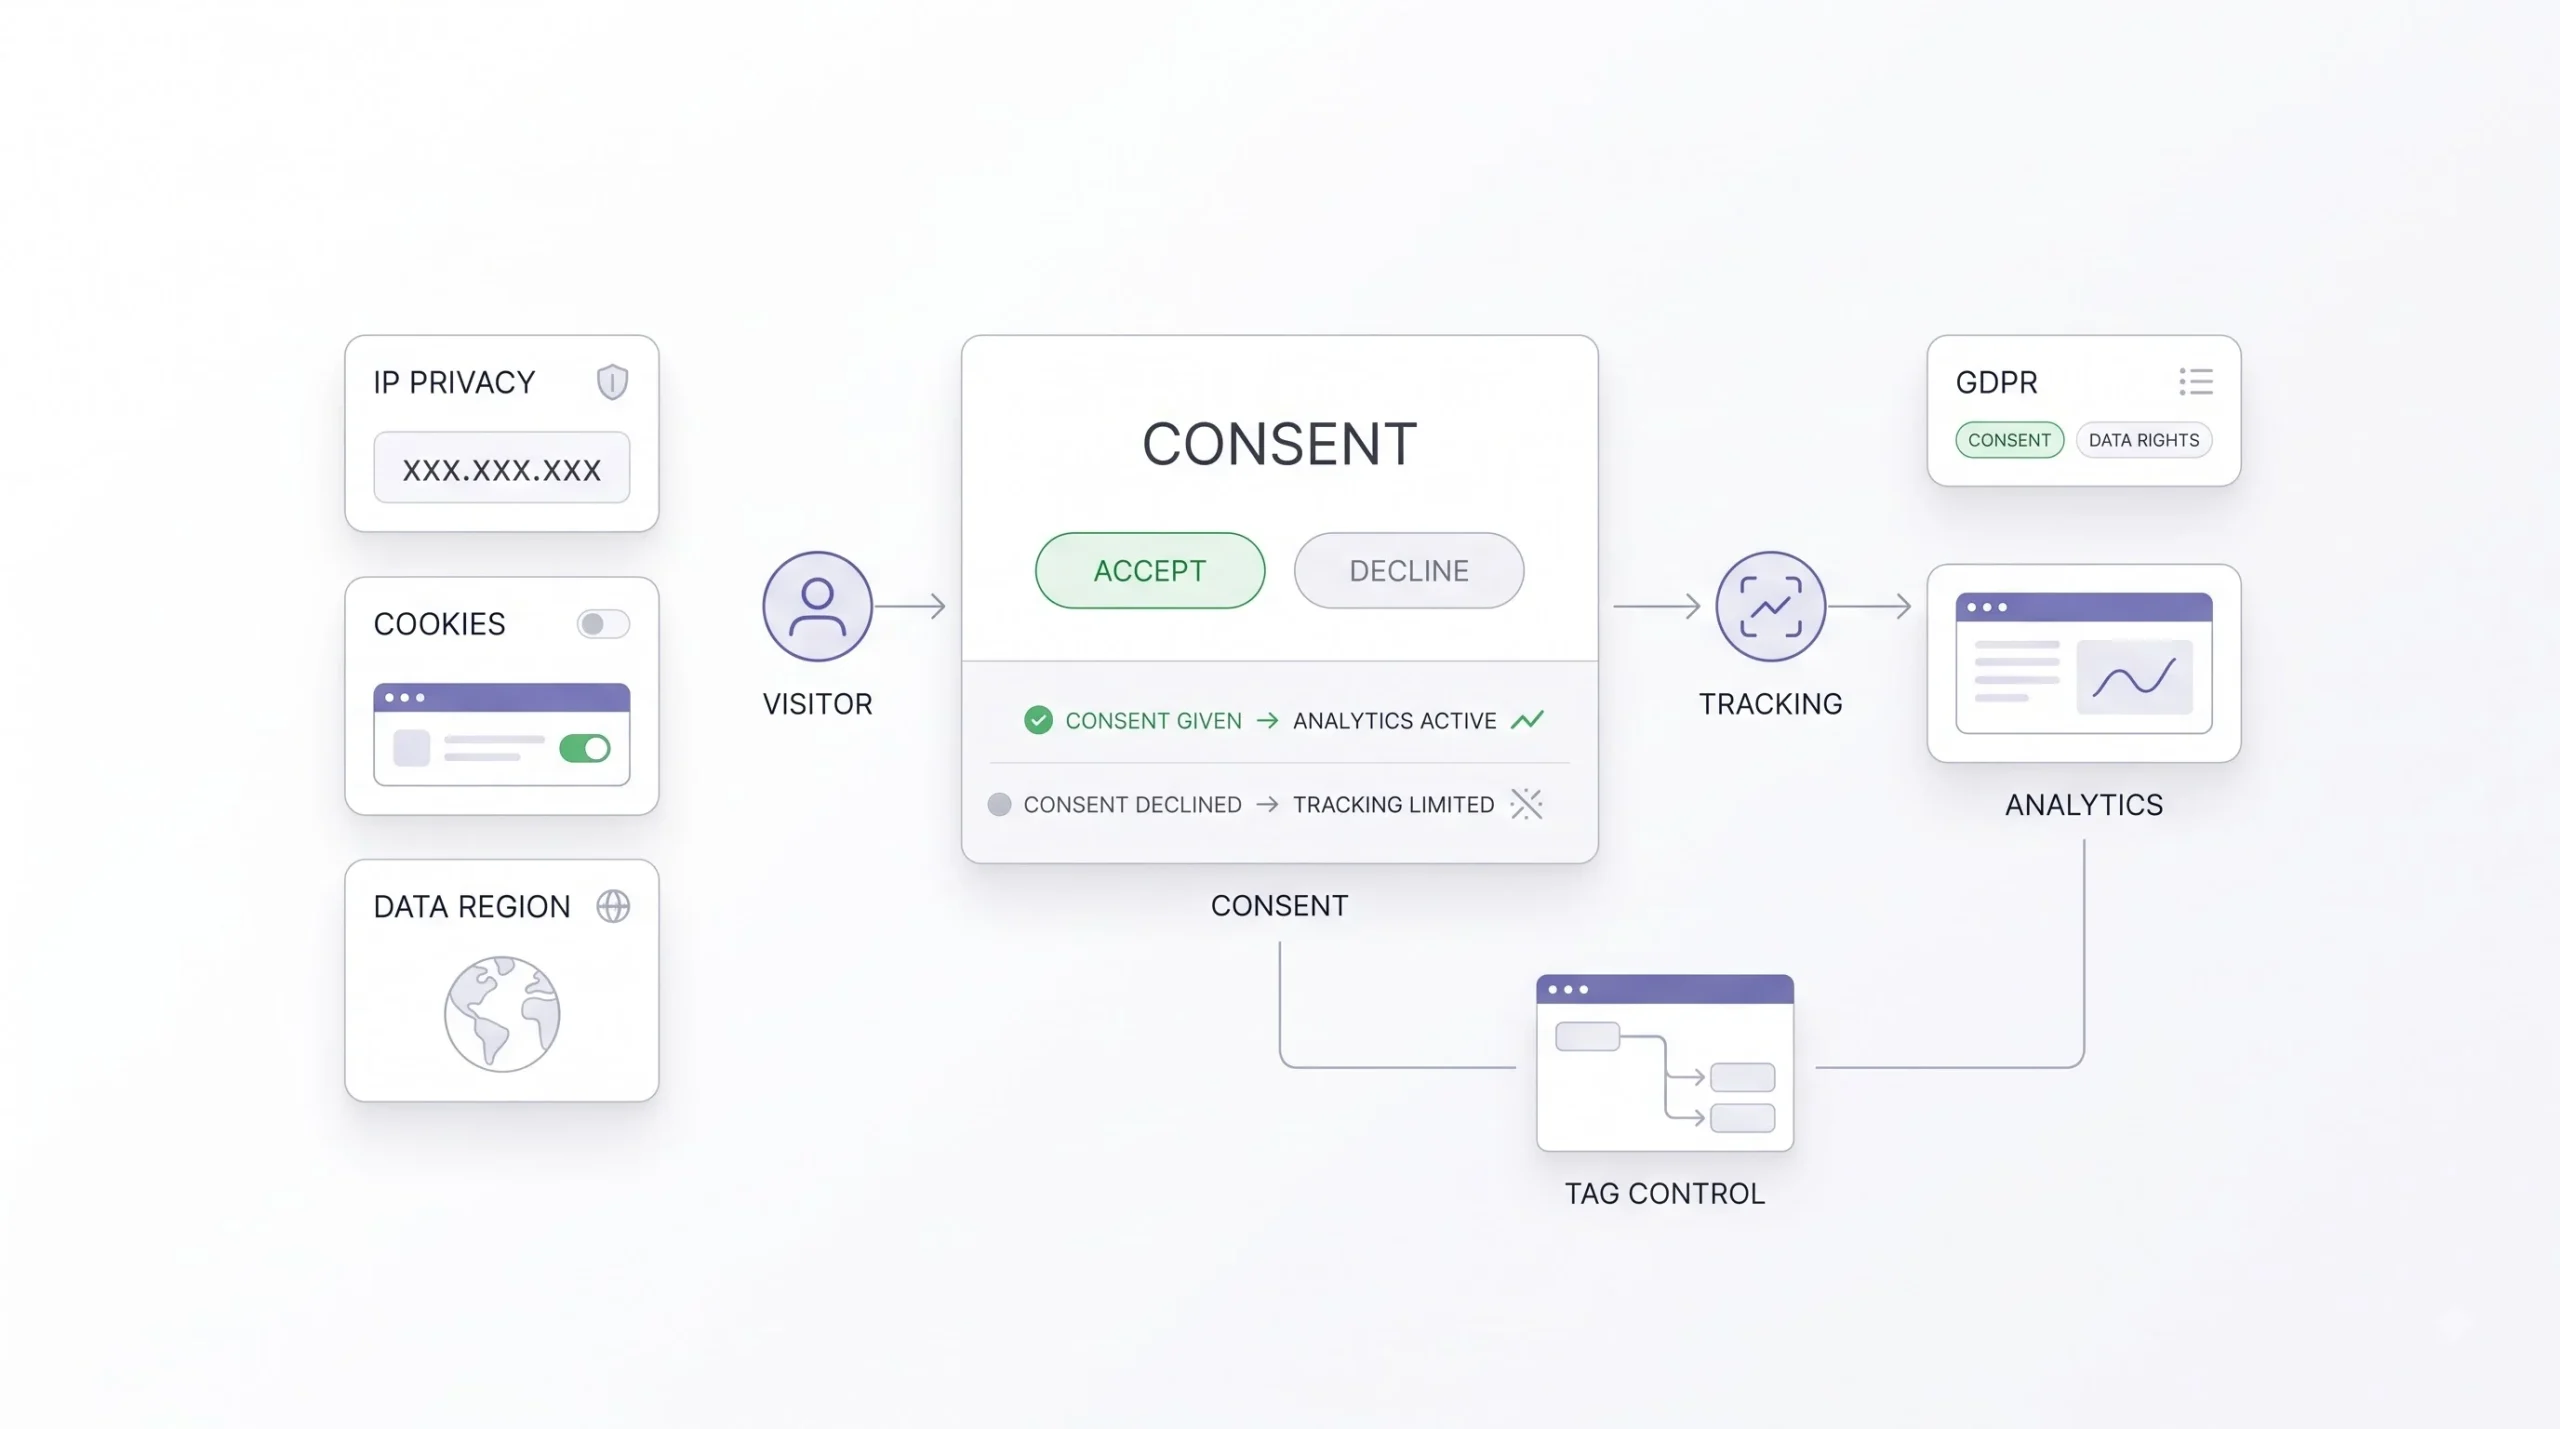
Setting up tracking isn’t just a technical task, there’s a privacy layer to think through too, especially for sites getting visitors from multiple regions or countries with different data regulations.
IP anonymization is handled by default in GA4. Unlike the old Universal Analytics setup, where site owners had to manually enable IP anonymization through a specific code parameter, GA4 doesn’t store full IP addresses the way the old system did, this is baked into how the platform processes data from the start. Not something that needs separate configuration.
Cookie consent banners still matter, though, and this is where a lot of sites fall short. GA4 does use cookies and similar browser identifiers to track user behavior across a session and across return visits. Depending on where visitors are located and what regulations apply to the business, a consent banner may be legally required, one that lets users accept or decline tracking before GA4 actually starts collecting their data, rather than firing automatically on page load regardless of consent. How exactly that consent gets technically wired up (usually through a consent management platform working alongside Google Tag Manager’s consent mode features, which can delay or block tags until consent is given) is a bigger, more technical topic on its own. But the awareness needs to exist right at setup time, not bolted on as an afterthought once someone raises a compliance concern.
GDPR context, briefly, and this is not legal advice. If a site gets any meaningful traffic from the European Union, GDPR considerations around consent, lawful basis for processing, and data subject rights apply, and this extends to analytics tracking, not just marketing emails or newsletters. Practically, for setup purposes, this means thinking about consent mechanisms before tracking fires by default, not assuming GA4’s default settings alone make a site compliant. Specific compliance requirements, especially for businesses handling EU visitor data regularly, should genuinely be checked with someone qualified in privacy law, this section is about awareness at setup time, not a substitute for that.
Understanding Your First Reports
Setup is done at this point. Now comes the part that actually matters, understanding what the dashboard is telling you, because installing GA4 correctly and then never opening the reports again is basically the same outcome as not installing it at all.
Realtime report. Covered earlier for verification purposes, but it’s genuinely useful on an ongoing basis too, showing who’s on the site right now, which pages they’re viewing, and roughly where they came from. Good for checking whether a newly launched campaign or a freshly published post is actually pulling traffic within the first hour of going live, instead of waiting a full day to find out.
Acquisition report. This answers “where is the traffic actually coming from.” Organic search, paid ads, organic social, direct, referral traffic, all broken down by channel, and drillable further into specific sources and campaigns. This is usually the first report worth checking on a regular basis, because it tells you which channels are actually pulling their weight and which ones are essentially dead weight that keeps getting attention out of habit rather than results.
Engagement report. This shifts the question from “how many people came” to “what did they actually do once they got here.” Which pages people spent the most time on, which events fired most often across the site, average engagement time per session, engaged sessions versus total sessions. This is where the event-based model from earlier really shows its value in practice, instead of just counting visits, you’re seeing actual behavior patterns unfold across the reporting period.
Reports snapshot and Explore section. Worth knowing both exist, even in a beginner setup. The snapshot gives a quick top-level overview combining a handful of key metrics and mini-charts in one place, useful as a fast weekly check-in view. Explore is GA4’s more advanced, fully customizable analysis tool for building specific reports beyond the fixed default templates, funnel exploration to see where people drop off in a multi-step process, path analysis to see the actual click-by-click journey people take, cohort comparisons to track how a specific group of users behaves over time. Genuinely powerful, but deep enough that it deserves its own dedicated guide rather than a quick mention here.
Conclusion
Getting GA4 installed correctly isn’t really the finish line, it’s the foundation everything else gets built on top of. Every future decision about content, ad spend, page changes, funnel fixes, all of it eventually traces back to whether the tracking underneath was set up right in the first place. Get this part solid now, and every report pulled for the next year actually means something, instead of being numbers crossed fingers are hoping hold up under scrutiny.
Setup’s done. Verification’s done. Key events are marked. The account structure is clean and won’t need a painful migration six months from now. Now the real work starts, actually reading what the data is saying and making decisions off it, instead of just watching numbers move without knowing why.
Frequently Asked Questions
Is Google Analytics free to use?
Yes, the standard version of GA4 is free with no cap on how many properties or data streams a single account can hold for typical business use. There’s a paid enterprise version called Google Analytics 360 aimed at large organizations needing higher data limits and dedicated support, but nothing about the setup covered in this guide requires it. Most businesses, including ones running significant traffic, never need to touch the paid tier.
How long does it take for Google Analytics to start showing data after setup?
Realtime data shows up within a minute or two of the tracking code firing correctly, that’s the fastest way to confirm installation worked. Standard reports (Acquisition, Engagement, and the rest) usually take a few hours to start populating and can take up to 48 hours to fully process and stabilize. Seeing gaps or low numbers right after setup isn’t a failure, it just hasn’t finished processing yet.
Can I use Google Analytics and Google Tag Manager together, or do I have to pick one?
They work together, not against each other. GTM is a delivery system for tags, GA4 is one of the tags it delivers. Installing GA4 through GTM instead of pasting the gtag.js code directly is actually the more common and more flexible setup for anyone who might add more tracking tools later.
Do I need coding knowledge to set up GA4?
Not for the core setup covered in this guide. Creating the account, property, and data stream is all done through the GA4 interface itself, no code involved. Installing the tracking code requires pasting a snippet into your site, which on WordPress or a website builder is usually a copy-paste job through a plugin or settings field. Custom event tracking through GTM uses a visual interface for triggers and tags too, though a basic understanding of how your site’s buttons and links are structured helps when setting up more specific custom events.
Why does GA4 show fewer users than my server logs or other tracking tools?
A few reasons stack up here. Ad blockers and browser privacy settings can block GA4’s script from loading at all for a portion of visitors. Bot traffic that shows up in raw server logs often gets filtered out of GA4 automatically. And GA4 counts users based on identifiers like cookies or device IDs, which won’t always match how a server log counts raw requests. Some mismatch between tools is normal, it doesn’t necessarily mean either tool is wrong.
What’s the difference between a “user” and a “session” in GA4?
A user is a unique person (or more precisely, a unique identifier representing that person) visiting the site, tracked across however many visits they make. A session is one continuous visit, a user can have multiple sessions over time, say if they visit the site three separate times over a month. GA4 reports both, and mixing them up when reading reports is a common beginner error, especially since the old Universal Analytics reports leaned much more heavily on sessions as the default lens.
Can I recover Universal Analytics data after switching to GA4?
Only if it was exported before Google fully phased out standard UA reporting access. GA4 does not import or merge historical UA data into its own reports, the two run as completely separate data sets. If historical UA data wasn’t backed up earlier, it’s likely gone for good at this point, which is exactly why this guide flagged exporting it early if it still mattered.
Do I need a separate GA4 property for my mobile app if I already have one for my website?
Not necessarily. GA4 supports adding both a web data stream and an app data stream (iOS or Android) under the same property, which actually gives a combined view of how the same audience behaves across web and app. Separate properties only make sense if the web and app represent genuinely different businesses or need fully independent reporting.
How do I know if my GA4 tracking code is installed correctly without waiting for reports?
Use the Realtime report right after installing, open the site in another tab, click around, and check whether activity shows up within a minute or two. Google’s Tag Assistant browser extension or GTM’s Preview mode both give a more detailed, technical confirmation showing exactly which tags fired and in what order, useful if Realtime shows something but it’s not quite matching expectations.
What counts as a “conversion” in GA4?
In GA4 terms, a conversion is any event that’s been manually marked as a key event inside Admin, Events. It’s not automatic just because something is trackable, someone has to deliberately flag which events represent a real business outcome, a form submission, a completed purchase, a call click, whatever matters for that specific business.
Is it normal for GA4 numbers to differ slightly from Google Ads or Search Console numbers for the same period?
Yes, and this trips people up constantly. Each platform uses its own attribution model, its own definition of a session or a click, and its own data processing timeline. Google Ads counts clicks its own way, Search Console counts clicks based on search result interactions, and GA4 counts sessions and users based on what actually landed and got tracked on the site. Some variance between these numbers is expected and doesn’t necessarily indicate a tracking problem.
Can I set up GA4 on a site that’s still under construction or not live yet?
Yes, and it’s actually a reasonable thing to do early, since it means the tracking is already in place and verified by the time the site goes live, instead of scrambling to install it after launch. Just be aware that any testing traffic during the build phase will show up in the data too, so setting up an internal traffic filter or simply noting the launch date for reference when reviewing early reports helps avoid confusion later.